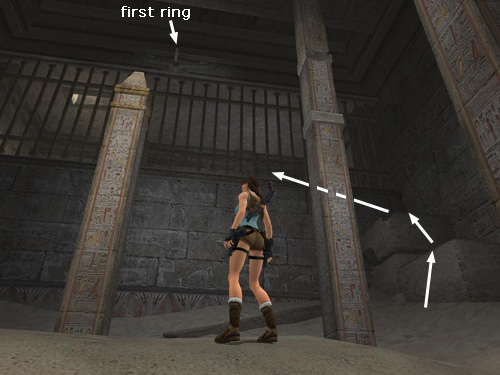
From the top step, where you got the medipack, take a running jump and grapple the metal ring high on the wall with the barred window.

Although there is a ledge you can grab off to the left (visible in the screenshot above), there's actually no need to wall-run here at all. Just hang from the ring and adjust the length of the cable so Lara's feet are planted at the bottom of the barred window. Then press Jump (without pressing any direction key or moving the analog stick) to leap off the wall and perch on the vertical post behind you. Quickly press Interact to steady Lara after the awkward jump.

Turn so the barred window is on Lara's left and then jump to grab the horizontal band on the first complete column ahead.

Jump to the right to grab onto the next column. (Alternatively, drop and grab the lower band on the first column before climbing around to the right side of the column and jumping back to grab the next column, as indicated by the broken arrows in the screenshot above.) When hanging onto the middle column, climb around to the right and then jump to grab the third column. Climb around to the right again and then jump up to grab the higher horizontal band on the same column.

Climb all the way around to the other side of the column, so the other two columns and the barred window are on Lara's right. Jump to the right to grab the middle column once more.

Position Lara so her back is toward the wall and the other two columns are to her left and right. Jump back to grab the small stone handhold on the wall behind. (Notice the weird floating shadow on the ground—one of the few graphical oddities in an otherwise gorgeous game.)

Finally, jump to the right and grapple the ring on the wall above. Wall-run and jump to the ledge ahead, where you'll find ARTIFACT #3.
[Return to the Temple of Khamoon Walkthrough]
Copyright © 2007- Stellalune (). All rights reserved. The TRA screenshots included here were made using Fraps. Feel free to copy or print this walkthrough for personal use. By all means, share it with friends, but please include this credit line so people can send me their feedback. No part of this walkthrough may be reproduced on another site without permission. Follow this link for details about this site's advertising and privacy policy.
|


