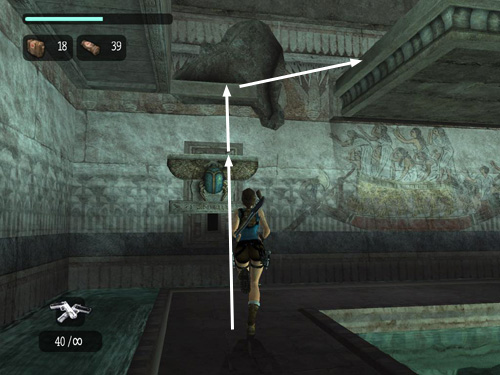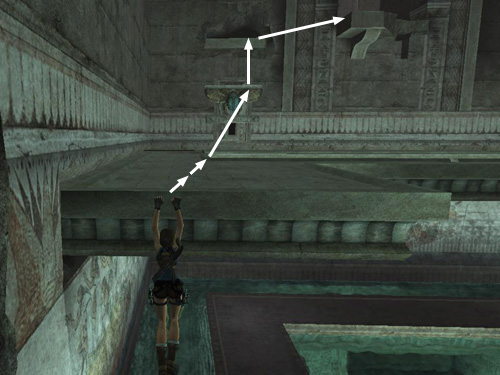
Face the scarab switch on the wall and take a running jump to grab it. Quickly jump up to grab the handhold above before the switch sinks too low. Climb to the right and jump to grab the ledge beyond.

This ledge starts to retract into the wall as soon as Lara grabs it. So quickly pull up onto it (it may help to tap the HUD key in order to center the camera behind Lara first), and run forward, veering a little bit to the right toward the scarab switch on the wall ahead. Taking running jumps instead of just running keeps the ledge from retracting too quickly, since it doesn't move unless Lara's weight is on it.
Try to time your running jumps so Lara takes off at the edge of the ledge (near the spot shown by the third arrow in the screenshot above, though the ledge will have retracted quite a bit by then). Then hold down the Jump key to keep Lara in the air a little longer and try to grab the scarab switch on the wall ahead. If Lara misses the switch, she may still land on the retracting ledge that runs along the wall below it. If so, try and jump up to grab the scarab switch before the ledge retracts. (It's much easier to do this on either side of the switch, where the wings are, than in the middle where the beetle's body protrudes.)
When you manage to grab the switch, quickly jump up to grab the handhold above before the scarab sinks too low. Then climb to the right and jump to grab the doorsill.
Special thanks to Ivan and Kim for pointing out this shortcut. I found it much easier than the longer sequence I had initially suggested for this section. If you have trouble with the method described above you might want to try the original strategy, which is included on a separate page.
[Return to the Temple of Khamoon Walkthrough]
Copyright © 2007- Stellalune (). All rights reserved. The TRA screenshots included here were made using Fraps. Feel free to copy or print this walkthrough for personal use. By all means, share it with friends, but please include this credit line so people can send me their feedback. No part of this walkthrough may be reproduced on another site without permission. Follow this link for details about this site's advertising and privacy policy.
|

