The Lost Valley - Early Shotgun
Instead of heading downstream at the start of the level, turn left as you emerge from the first tunnel and follow the cave wall around the rough stone pillar to the stream. Now you're going to head upstream, hopping from bank to bank. Be careful not to fall in the water. The current will wash Lara over the falls into the lake below. She won't take any damage, but you'll have to climb back up and start all over again.
NOTE: If you're having trouble with these jumps, you might want to review the section on HOW TO SET UP JUMPS on my Strategy page. With these simple techniques you'll almost never miss a jump again.
First take a running jump from the starting point to the far side. Walk a few steps upstream and then turn and take another running jump back to the other side. Walk up the slope to the top where it juts out above the stream. Take a standing jump to the ledge across the water. (For this jump, be sure to start on the left side of the ledge or press Action to lower Lara's arc as she jumps; otherwise, she'll hit the ceiling and fall into the water.) Turn left and take another standing jump to the ledge just upstream. Turn left again to face across the stream. Position Lara at the middle or right side of this ledge, walk to the edge, and then take a standing jump to grab the opposite side. Pull up and follow the twisting passageway around to a wooden bridge.
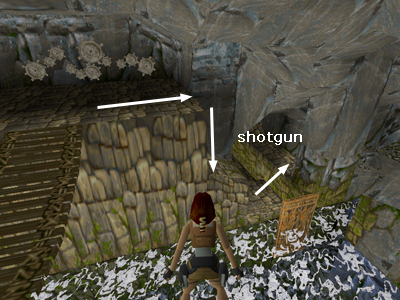
The machine on the other side of the bridge can't be activated yet. For now, to get the shotgun, cross the bridge and drop down onto the stone ledge below on the right (indicated with arrows in the screenshot below). Drop to the small ledge below and jump across the stream to the skeleton on the ledge. Among the bones, you'll find the SHOTGUN.
To get back to the start of the level, either go back the way you came, or jump into the stream on the other side of the gold gate and let the current carry Lara over the falls. Pick up the main walkthrough from the beginning.
NOTE: If you want to, you can go after what would be secret #5 before going downstream. You'll find directions to it in the main walkthrough. You'll have another chance to get it when you return here at the end of the level.

Walkthrough text and diagrams copyright © 1998- Stellalune (email ). All TR1 screenshots were made using Glidos and Fraps. Feel free to copy or print this walkthrough for personal use. By all means, share it with friends, but please include this credit line so people can send me their feedback. No part of this walkthrough may be reproduced on another site without permission. Follow this link for details about this site's advertising and privacy policy.