IMPORTANT NOTE ON SAVING & CHECKPOINTS: Checkpoints are the spots in each level where the game auto-saves. These are noted in blue and numbered in the walkthrough text to correspond with PC, Macintosh, PSP & Wii savegame files available for download. (Please note that the number and location of checkpoints vary slightly for the Nintendo Wii game.) Although it is also possible to save manually, the save system in Anniversary is very different from the older Tomb Raider games and differs in several ways from the TR Legend save system. Please see the Anniversary Controls page for details. This may save you a great deal of frustration as you make your way through Lara's latest adventure.
LEVEL 4: TOMB OF QUALOPEC | Updated: 4/29/08(†) |
Kills: 6 Supplies: 6 Other: SCION OF QUALOPEC
Artifacts: 2 Relics: 0 Rubbing Rewards: 1(*)
Time Trial: 13:00(**)
NOTE: If you didn't find the SHOTGUN in the previous level, you'll get it at the end of this level.
After the first CHECKPOINT, follow the rough-hewn tunnel to CHECKPOINT 2, beyond which there is a pit with vertical poles and a horizontal bar. There are handholds and a ledge below the rim of the pit on the right. You can use these to climb back up if you fall, but unless you're playing the Wii game, there's nothing of interest down there.
If you are playing on the Wii, drop down into the pit and go to the far end. There you'll find a rough section of stone wall with which you can interact. Lara selects the trowel automatically. Use the Wii remote to move the tool around the screen. When the tip of the trowel finds a weak spot, the remote vibrates and the magnifying glass icon lights up. Press and hold the A button and wiggle the remote from side to side to work the trowel under the stone. Flick the remote sharply to pry off the loose rock. Repeat until the carving beneath is entirely revealed. This is a RUBBING REWARD (2/12), called "Fertility God." The tools then switch to the paper and charcoal. After making the rubbing, return to the other end of the pit and climb back out.
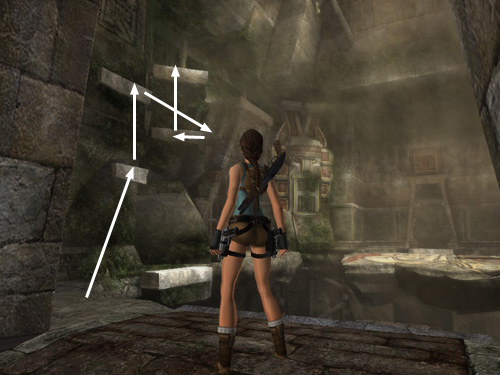
To get across the pit, jump to the first perching pole, then to the horizontal bar. (If Lara grabs one-handed and starts to swing wildly, press Interact to do a saving grab.) Swing around and jump to the next vertical pole, then the third. (Again, press Interact if Lara starts to lose her balance.) Jump to the corner ledge on the right. Then jump to grab the other edge of the pit. Pull up and continue to CHECKPOINT 3.
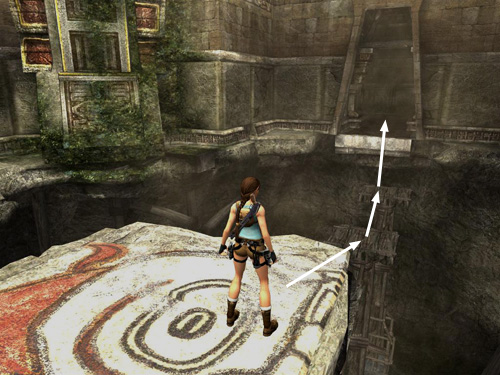
BIG ROOM WITH BROKEN FLOOR: Ahead is a large room with a painted floor that has partially collapsed. Ahead and on the left and right are large, trapezoidal doorways. Jump across the gaps in the floor to reach the doorway straight ahead. Start up the ramp and immediately run down and to either side to avoid the huge boulder that rolls down from above. The boulder crashes into the fragile floor, breaking part of it and smashing to pieces. After the boulder passes, THREE GATES descend, blocking the ramp.
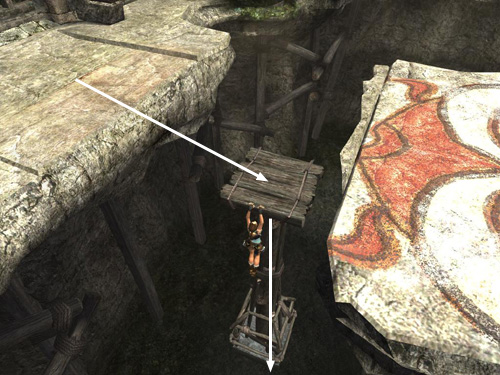
Jump to the small, wooden platform between the doorway and the painted floor and drop from there into the pit below (as shown in this screenshot). Grab onto the base of the tall, wooden support pillar (the one supporting the wooden platform from which you just dropped) and pull/push it into the gap between the painted floor (now ceiling) and the doorway above on the left (when facing the doorway with the THREE GATES above). There's a worn patch of ground in roughly the spot where you want the pillar to go (shown in this screenshot).
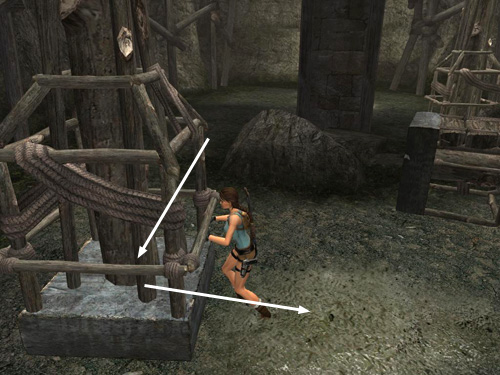
Pick up the 50-caliber ammo in the corner. Now move the smaller rectangular box/cage toward the handholds on the wall below the entrance to this area. Use the box for a boost to reach the lowest handhold and climb back up to the entrance. Take a running jump from the painted floor to the small platform on top of the support pillar you just moved. There's a tempting-looking white stone ledge off to the right, which Lara could reach from here, but ignore it for now. Instead, jump to grab the doorsill ahead (as shown in this screenshot) and pull up.
LEFT HALLWAY: Follow the hallway to CHECKPOINT 4. Ahead on the floor is a box of shotgun ammo. Beyond it there's a dart trap and a deep pit. Watch the timing of the flying darts and take a running jump past the trap to grab the horizontal bar beyond. Swing around and jump to grab the handhold on the wall ahead.
The next section involves climbing along a series of handholds and jumping past more dart traps. For each jump, it's important to climb all the way to the edge of the handhold. When you hold the direction key, Lara will lean in the direction she's about to jump. Doing this before actually pressing the jump button helps you see where you're headed and allows Lara to jump a little farther. It's also critical that you time each jump so Lara doesn't get hit by flying darts. If she does, she'll fall to her death in the pit below. Note, too, that Lara can only grab the clean, light-colored stone handholds, not the mossy ledges. These are too slippery to grab and she'll fall if she tries.
Here's the sequence: Climb then jump to the left. Climb then jump to the left again. Then, either climb then jump to the left past the darts, or drop down, climb to the left below the dart trap, and then jump up. Climb to the middle of the ledge and then jump back to grab the ladder on the opposite wall. Climb to the top and then jump to the right. Climb then jump to the right. Climb to the middle of the handhold and then jump back to perch on the vertical pole. From there, jump to the ledge ahead.
Continue along the hallway. Just around the next corner there's a small medipack on the ground. Keep going, pick up another small medipack and carefully navigate another series of dart traps lining the walls. Cross CHECKPOINT 5 and continue past another set of dart traps to a room that's seen better days.
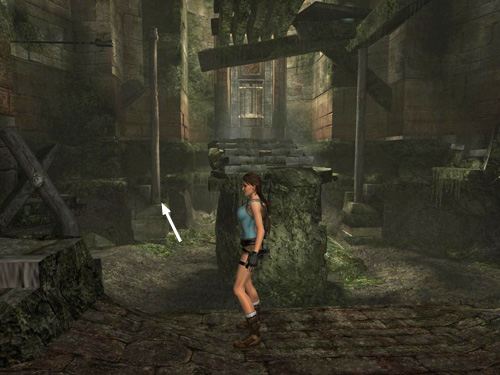
MOSSY ROOM WITH BROKEN STAIRS & FIRST GATE SWITCH: Ignore the grapple point on the ceiling and instead step down into the room. Cross to the back left corner and jump up onto the stone base supporting the vertical wooden pole (shown in this screenshot). Jump again to grab onto the pole. Or, if you prefer, use the metal ring above to grapple-swing from the entrance to the broken stairs. Go to the top of the stairs, turn left and jump to grab the vertical pole.
Climb to the top of the vertical pole and jump to grab the horizontal bar on the left. Because of the low ceiling, the camera is a little difficult to control here. It may help to face the wall, so the stairs are behind Lara, tap the HUD key to move the camera behind her, and then jump to the left to grab the bar. Swing around and jump to grab the handhold ahead. Then climb up onto the wooden platform.
Cross the platform and pick up some 50-caliber clips. Then go to the edge farthest from the entrance and jump to grab the ledge above the switch. Drop to grab the switch. Lara's weight pulls it down, and you see a brief cut scene of the first of the THREE GATES opening back in the BIG ROOM WITH THE BROKEN FLOOR. This is CHECKPOINT 6. Drop down and exit the way you came.
HALLWAY (again): Return past the first set of dart traps, which are now quite a bit more active, turn the corner and head down the steps. Now this hallway has swinging blades along with the darts that were there before. If you're not doing a time trial and can take a few moments, stand to the left or right of center, close to the dart pipes but not too close, and watch the darts and blade. When the blade swings away and there's a pause between darts, run through. Repeat for the next traps and then continue on.
Just beyond the blades and darts, the squealing of a raptor sounds. Run up to the corner to trigger CHECKPOINT 7 and meet the dinosaur. If you do this, you'll have plenty of room to back up shooting without running into the traps. Also, if Lara does get killed, the game will reload after the blades.
When the raptor is dead, continue to the deep pit. Jump past the first set of darts to perch on top of the vertical pole. Jump to grab the handhold ahead. If Lara grabs the lower handhold, jump up to the higher one. Climb then jump left. Climb then jump left again. Climb to the top of the ladder and then press Up + Jump to leap off and grab the handhold on the opposite wall. Now either climb and jump to the right or drop down, climb to the right, and jump back up. Climb then jump to the right again. Repeat once more to reach the corner handhold. Jump back to grab the horizontal pole. Swing and jump past the darts into the hallway beyond. Continue to CHECKPOINT 8.
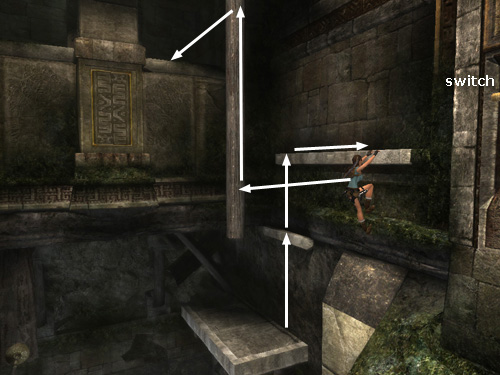
BIG ROOM WITH BROKEN FLOOR (again): Don't drop down yet. Instead go to the left along the ledge. Jump to grab the white stone ledge above and to the right. (This screenshot shows the spot.) Jump up to grab the ledge above, climb to the right and then jump to grab the lower handhold on the broken column ahead. Climb to the left, then jump up to grab the top edge and pull up. From there you can take a running jump to grab the vertical pole with the gold bands. Climb to the tip and jump to the ledge above the doorway with the THREE GATES.
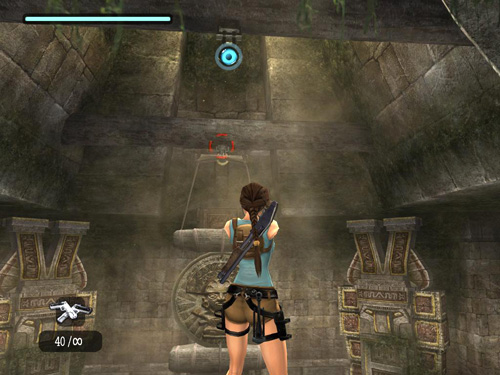
SECOND GATE SWITCH: Turn to face out over the room. Notice the metal ring above. There's also another one farther out on the ceiling but it's holding up that big metal gong. Switch to pistols and shoot the bracket attaching the gong to the ring (as shown in this screenshot). You can use manual aim mode if you like. The target is a little too far away for the reticle to turn red, but even with a gray reticle, you should be able to hit it. When you do, the gong will crash into the floor below, leaving the metal ring free for grappling.
Now you need to grapple-swing across the room using both rings. Take a running jump off the edge and quickly press Grapple to snag the first ring. Press Up to swing back and forth. When you've got a good swing going, swing forward, press Jump to free the cable, then quickly press Grapple again to hook the second ring. At this point you may need to adjust Lara's position left to right or climb up/down the cable a bit so that Lara will swing directly toward the doorway ahead. Get a good swing going then jump into the doorway. Use the switch to open the outer gate and trigger CHECKPOINT 9.
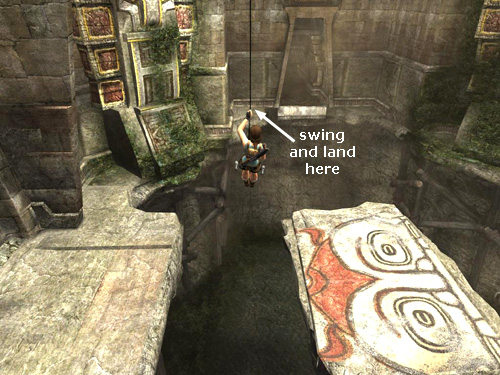
Now you're headed for the doorway on the right side of the room (when facing out toward the doorway with THREE GATES). The quickest way to get there is to take a running jump from the switch alcove and grapple the nearest metal ring on the ceiling. Then swing, jump and grapple the next ring. While hanging from the cable, turn right and lengthen the cable as far as it will go. Then swing and jump to land on the small, uneven ledge to the left of the doorway (as shown in this screenshot). From there, you can jump into the doorway.
Alternatively, hang from the edge of the alcove with the switch and drop to the floor near the entrance. Climb down into the pit using the same handholds you used before to climb out. When the gong fell, it crashed through another section of floor, freeing a second wooden support pillar. Now you have two pillars to work with. Move one of them as close as it will go toward the doorway above (i.e., the one on the right when facing the THREE GATES). Then move the other between the first pillar and the broken edge of the painted floor (as shown in this screenshot).
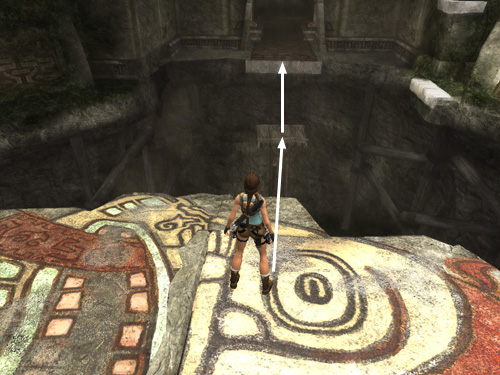
Climb back up the handholds to the entrance. Then jump to the painted floor and from there to the first small platform, then to the second, then to the doorway, (as shown in this screenshot).
RIGHT HALLWAY - ARTIFACT #1: Pull up and follow the hallway to CHECKPOINT 10. Ahead the floor has collapsed, leaving another rough pit. Drop and hang from the right edge. Drop down twice then go to the other side of the pit to find ARTIFACT #1 (15/44). It's not hard to locate; you just can't see it from the rim of the pit. To get out, climb the vertical pole near the handholds where you climbed down. Jump to grab the edge of the pit. Watch out for the darts as you pull up.
Now jump to perch on top of the wooden pole. From there jump to grab the handhold on the left wall. Climb to the right and jump past the darts to grab the next handhold. Climb to the right, drop down once, climb to the right again and jump back to land on another vertical pole. Ignore the horizontal bar on the right and just jump forward to the ledge. Follow the hallway to CHECKPOINT 11.
ROOM WITH THIRD GATE SWITCH: If you have room for it in your inventory, pick up the box of shotgun ammo just inside on the left. Then approach the switch. When you do the floor collapses, dropping Lara into the room below. When she hits the ground, 2 wolves immediately attack. Take care of them and then go up either ramp to the back of the room. Pull the cage out of the small alcove and push it off the wooden ledge onto the ground.
Move the cage up against the square stone pillar on the right (when facing the switch above) and use the cage to reach the handhold on the pillar. Jump up to grab the higher handhold. Then jump back to grab the vertical pole that extends from the ceiling. Climb to the top of the pole and jump to grab the next one. Climb to the top of that pole and jump to grab the light stone ledge on the square pillar ahead. Traverse around to the right and jump back to grab the horizontal bar. Swing, jump and grab the whitish ledge ahead. Pull up near CHECKPOINT 12.
ARTIFACT #2: Grab the handhold on the wall ahead. Jump to grab the one above, then climb to the right until the long vertical pole is behind Lara. Jump back to grab it. Then climb to the top. Don't jump over to the switch yet. Instead turn to face the side wall, where you'll see two square openings. Jump to grab the edge of the nearest one. Pull up into the small room to find ARTIFACT #2 (16/44). (This screenshot shows the sequence.)
To get to the switch from here, hang from the opening where you just climbed into the room. Climb all the way to the left side and then jump back to grab the vertical pole again. Climb to the top and this time jump to grab the ledge above the switch. Drop to grab the switch itself and pull it down. This opens the last of the THREE GATES back in the BIG ROOM WITH THE BROKEN FLOOR.
Don't drop down to the floor. (If Lara falls accidentally, climb back up to the switch the same way you did before.) Instead, jump from the switch to grab the horizontal bar on the right. Swing, jump and grab the handhold ahead. Traverse around the corner to the left, jump up to grab the higher ledge, climb back to the right, then up into the room above. Go to the other doorway and hop down into the room below. Exit the way you came, passing CHECKPOINT 13 on the way out.
HALLWAY (again): There's another velociraptor around the first corner. Take it down and continue along the hallway to the pit. Jump onto the vertical pole and from there to the handhold ahead. Climb to the left, then up, then left again. Now you can see another raptor in the pit below. (Now where did he come from?) Try not to fall down. Jump past the darts to grab the next handhold. Climb to the left and jump past the next set of darts. From the left side of the last handhold, you can jump directly to the rim of the pit; no need to jump back onto the pole first.
If you want to, you can shoot the raptor from the edge of the pit using pistols and manual aim. It shouldn't take too long, and unless you missed ARTIFACT #1 before, there's no need to climb down into the pit. Continue along the hall past CHECKPOINT 14.
BIG ROOM WITH BROKEN FLOOR (again): Hang from the edge of the floor and drop into the pit. Lara will slide down without injury. Cross the pit and use the handholds on the left to climb to the entrance as you did earlier. Hop across to the painted floor. Then take a running jump to the doorway where the THREE GATES were. (Or, if you moved the two wooden platforms, just jump across the tops of them to the painted floor. Then jump from there to the doorway.) Go up the ramp and follow the hallway around to either side and on to CHECKPOINT 15.
QUALOPEC'S THRONE ROOM: Approach the piece of the Scion hovering above the pedestal.
A cut scene follows, in which Lara reads the inscription above the throne and gets a nasty surprise.
After the cinematic, the SCION OF QUALOPEC is in the items section of your inventory and CHECKPOINT 16 registers. The doorway behind you has been blocked by a cave-in. Tremors rock the tomb, but the actual danger is minimal, as long as you don't get distracted by the quaking and fall off a ledge or something. As far as I can tell, there's no time limit but also nothing else to do here. So make your way back down the ramp to the BIG ROOM WITH BROKEN FLOOR. Jump across to the exit, on the opposite side of the room. Cross CHECKPOINT 17 and continue along the passage.
Now there's another raptor in the pit ahead. Jump to the corner ledge and shoot it from there. Use manual aim if you prefer. Then either jump across using the poles or drop down, cross the pit and climb out on the other side. CHECKPOINT 18 is just beyond the pit. Follow the tunnel to the end.
NOTE: There's one more auto-save, CHECKPOINT 19, just as Lara reaches the tunnel opening. It flashes past pretty quickly and then the game goes right into the cut scene, but if you manage to save manually at this point and then reload, Lara can continue on into the WATERFALL/MACHINE area of the Lost Valley without triggering the cut scene. To do that, you must return to the previous checkpoint near the pit (where you'll find the raptor still alive, in case you want an extra kill) or cross the pool and climb up to the checkpoint in the tunnel leading back to Vilcabamba. Then return to CHECKPOINT 18 and the cut scene should start normally.
In the next interactive cut scene Lara reaches the far side of the pool only to find Larson waiting for her. He wants the piece of the Scion, but she's not giving it up. A scuffle ensues and you must use the controls as they are displayed on the screen in order to beat him.
BUG NOTE: If you're having trouble with the interactive cut scene because the icons indicating which buttons to press don't appear, see the footnote at the end of the Lost Valley walkthrough for some possible solutions.
NOTE: If you didn't find the SHOTGUN in the Lost Valley, you'll get it here from Larson.
A second cinematic shows Lara breaking into the Natla Technologies building and discovering the location of the second piece of the Scion. Apparently Lara is already familiar with St. Francis Folly.
NOTE: Apparently there is a potential bug in the final cut scene of this level, in which the cut scene finishes leaving the player in control of Lara on the roof of the Natla Technologies building. There's no way out, however. So you'll need to either reload an earlier save and run through the cut scene again or download a save file for the next level and play on from there. So far I haven't been able to reproduce this bug myself, but in case you want to check it out, a helpful player sent me a PC save file with Lara on the roof of the building. Thanks, Emre! :) Click here to download the file, and here for instructions if you need them. (So far I've only heard of this happening in the Windows and Macinsosh games. If anyone has experienced this on one of the consoles, I'd like to hear about it.)
†UPDATE HISTORY: 6/2/07 - First draft of walkthrough posted online.
6/8/07 - Fixed a couple of mixed up lefts and rights, thanks to Paul K.
9/14/07 - Added a few extra screenshots and alternate strategies, including grapple swinging from the switch above the entrance to the hallway on the right. Thanks to dollhobbs and Mark R. for that excellent shortcut.
12/28/07 - Added note about cut scene bug at the end of the level.
2/5/08 - Added Nintendo Wii edition info.
2/11/08 - Changed the numbering system for artifacts, relics and rubbings, as explained in the note below.
2/16/08 - Added Xbox 360 interactive cut scene controls, thanks to James S.
2/19/08 - Added PSP interactive cut scene controls, thanks to Russell M.
4/29/08 - Added Macintosh save files and info. Thanks to Andrew W. and Chris H.
ACKNOWLEDGEMENTS: Thanks to Andrew F., Andy M., Bob G., Chris O., dollhobbs, Emre, James S., Mark R., Paul H., Paul K. and Russell M. for their help with this level.
*ABOUT ARTIFACTS, RELICS & RUBBING REWARDS: Finding artifacts and relics (formerly known as "secrets") unlocks various extras like outfits and concept art. The Nintendo Wii game also includes "rubbing rewards" in some levels. I have numbered each of these bonuses in the walkthrough. So, for example, "Artifact #2 (10/44)" means that this is the second artifact in this particular level and the 10th out of 44 artifacts in the whole game. Please see Anniversary Rewards page for more info on all of these.
**ABOUT TIME TRIALS: After completing a level, you will be able to replay it in Time Trial mode to unlock cheat codes. For more info, please see the Time Trials and Rewards pages. For help beating this level's time trial, see Eldin's Tomb of Qualopec - Time Trial Tips.
WAS THIS WALKTHROUGH HELPFUL? If not, I apologize and invite you to contact me with any questions. If you need help right away, I recommend the r/TombRaider subreddit. Other fan-run forums are listed at tombraiders.net/stella/community.html. If this site was useful, please consider supporting it financially or in other ways. For details, visit tombraiders.net/stella/support.html. As always, I welcome your corrections/suggestions. Thank you!
Copyright © 2007- - Stellalune (). All rights reserved. The screenshots and videos included here were made using Fraps. Feel free to copy or print this walkthrough for personal use. By all means, share it with friends, but please include this credit line so people can send me their feedback. No part of this walkthrough may be reproduced on another site without permission. As an Amazon Associate I earn from qualifying purchases. Follow this link for details about this site's advertising and privacy policy.
Stella's Tomb Raider Site: tombraiders.net.