IMPORTANT: If you haven't already done so, you may want to review the INTRODUCTORY NOTES on the storyline, controls, treasures/relics and saving/checkpoints. These appear at the start of the PROLOGUE walkthrough.
As always, I highly recommend that you do not rely exclusively on the autosave. Instead be sure to save manually at least once or twice each level. Then, if you miss something or run into a bug, you can reload rather than having to replay the entire level. Many common bugs are documented in this walkthrough. They are in hot pink text, like this, so they're easy to spot. I have also included an overview of major bugs without game spoilers. However, not every potential problem is covered here. So be safe; save often in new slots. In case you need them, Underworld Save Files for PC, PS3 and Wii are available.
Stella's Tomb Raider Underworld Walkthrough - For Windows PC, PlayStation 3, Xbox 360 and Xbox One
(PlayStation 2, Nintendo Wii and DS - click here)
LEVEL 7: ARCTIC SEA - PART 1: HELHEIM | Updated: 11/20/14(†) |
Health Items: 8 Treasures: 29* Relics: 0 Keys/Puzzle Items: 4
*There are 30 treasures in the entire Helheim chapter. All but one of these can be found in this level. They are numbered 1/30 through 29/30 below.
Before the level starts, choose Lara's outfit—Drysuit Light or Wet Suit—and starting secondary weapon. You'll probably need the spear gun first.
Cinematic: Lara arrives at the coordinates Natla gave her, apparently not too far from the Jan Mayen site. She parks the motorcycle at a safe distance and uses an explosive charge to blow a hole in the ice, revealing the long-submerged ruins below. Lara then plunges into the icy water.
SUBMERGED RUINS: Swim down and forward through the opening in the ice. Head toward the large statues below.
There are several sharks slowly circling this area. You may not have to deal with them, but be alert for danger, since they can sneak up on Lara as you explore. If you want to be really safe, swim around and take them all out before you start exploring. I'm not sure if more appear the longer you spend in this area, but I encountered 6 sharks in all.
Mjolnir doesn't work as well underwater as it does on land. Unless you get very close, you'll need to hit each shark with numerous lightning bolts in order to kill it. I prefer the spear gun here, but take your pick.
GIANT STATUES AND HELHEIM DRAWBRIDGE: Now survey the area. Six huge Norse warrior statues, arranged in two rows of three, face each other across the road that leads up to the entrance to the ruins. The building itself consists of a ziggurat-like structure with a large central tower and smaller towers on each side. The drawbridge is raised, preventing Lara from getting inside.
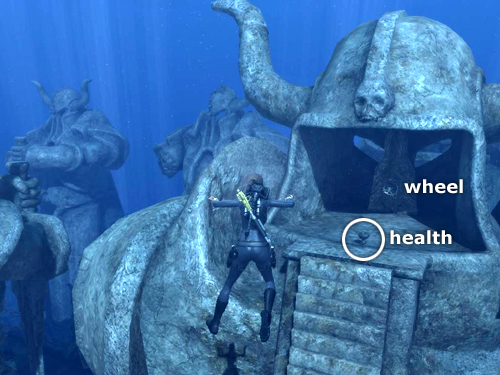
The first step is to free the chains that prevent the drawbridge from moving. These are held fast by the colossal warriors' swords. Swim to the first statue on the left (i.e., the one farthest from the building on the left when facing the building). Behind its head is a small room containing a health potion and a shiny metal wheel (shown in this screenshot). Swim close to the wheel and press Interact to pull it. This raises the statue's arms, thus pulling the sword out of the huge drawbridge chain.
Repeat this process for the second statue in this row, raising its sword and completely freeing the chains on the left.
The third statue in this row is broken off at the waist, so there's no mechanism to use. In the small hollow inside what's left of its body, you'll find a shiny treasure (1/30). (This screenshot shows its location.)
Swim across the road to the third statue in the row on the right (i.e., the one closest to the building on the right side of the road when facing the building). This statue needs a bit of repair before it will function. Swim down to the sea bottom between this statue and its neighbor. There you'll find another health potion and 2 enormous gears. A blue glow emanates from the carved runes on the gears when Lara approaches. This should give you a clue about what to do.
That's right; with her new accessories, Lara is able to lift the gears easily. Grab the first one by swimming close to it and pressing Interact. Use the usual swimming controls to carry the gear to the side of the statue, where you'll see two shafts missing gears. Maneuver the gear near one of these shafts and press Interact to guide it into place. Swim back down for the second gear and place it on the second shaft. Now swim up to the statue's head and pull the metal wheel. A cut scene shows the gears turning and the statue raising its sword.
The other two statues in this row don't need your attention. One is broken and the other already has its sword raised. So as long as you've raised three swords, you've finished here.
If you are not collecting treasures, skip down to the LEFT TOWER section, below. Otherwise, take a short detour to grab a few goodies.
TREASURES ON THE SEA FLOOR: Between the statues and the building, there's a dark trench—presumably the moat that the drawbridge once spanned. Swim down into this trench. When you spot the bones of a shark or whale on the bottom, head to the right. (These screenshots show the path to the three treasures here.) Swim along the bottom of the trench until you see a shadow on the left wall of the trench cast by the statue above. Swim toward it and look on the ground for a shiny treasure (2/30). It's hard to see in the gloom, so turn on the Utility Light if you haven't already.
Swim back along the trench toward the whale bones. Just before you reach them, turn left into a dark cave to find another treasure (3/30), along with a health potion.
From this cave, swim back out toward the whale bones and head to the left along the trench. Follow the right wall of the trench. Just beyond where it juts out, look on the sea bottom to find one more treasure (4/30). Once you have it, swim straight up to emerge from the trench near the LEFT TOWER.
The next step in opening the drawbridge is to locate the four power stones, which will provide energy to operate the bridge mechanism.
NOTE: It doesn't matter whether you enter the left or right tower first. This just seemed like the most convenient path from statues to treasures to ruins.
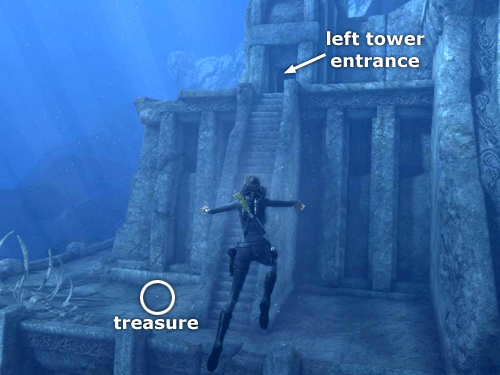
LEFT TOWER: There's another treasure (5/30) on the flat ledge at the bottom of the long flight of stairs leading up to the tower entrance. The treasure is a bit hard to spot from a distance, but swim between the bleached rib cage and the stairs and you'll see it glistening on the sand. (It's also circled in this screenshot.)
Swim up to the tower entrance, pick up the health potion in the doorway and go inside. Inside the left tower, straight ahead there's a ladder on the wall. To the right is a flooded hallway leading away from the entrance. For now, swim forward toward the ladder and up through the hole in the ceiling. Continue upwards to surface in an air-filled room.
Climb out of the water onto the ledge. The breakable jars here are all empty. So ignore them and step up onto the low block in the right corner. Grab the narrow corner ledge above and pull up to stand on it. Sidestep to the right (Lara's left) and then jump to the right to grab the metal beam above. Pull up, walk to the end of the beam and then jump onto the perpendicular beam. Jump from there to grab the ladder on the wall ahead. Climb to the top and then jump (just press Jump, no direction keys or stick) to land on the ledge behind.
Here you'll find a HELHEIM POWER STONE (1/4), the reddish object resting on the circular carving. There's also a treasure (6/30) in one the clay jars.
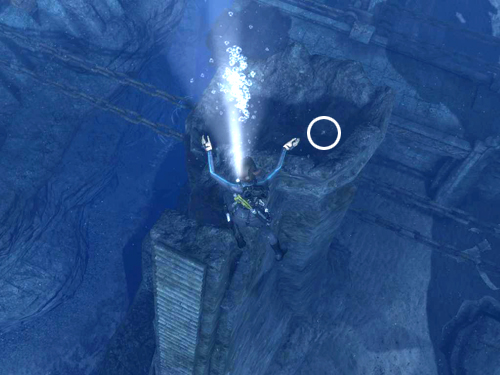
Instead of climbing back down, face the smaller hole in the floor so the circular carving is on Lara's right. Then step off to hang from the edge of the hole (as shown in this screenshot). Drop into the water below.
Swim down toward the tower entrance but don't leave yet. Instead follow the hallway to the left. At the T, first go to the right to find a treasure (7/30) tucked in among the rocks at the top of the flooded staircase. Then turn around and follow the passage in the other direction, straight on to another room with a ladder on the wall. Swim to the top of this room to reach another flooded corridor.
About halfway along this corridor, before you reach the room with the slit-shaped windows, there's a pair of ladders on the side walls. Swim up toward the ceiling here. On the left, there's a treasure (8/30) resting among the jumble of fallen rocks. On the right, a short passageway leads to another small room with slit windows, which face out toward the left tower. Here you'll find another treasure (9/30).
Swim back down to the corridor, then turn right and swim toward the small room at the end. This is actually the front room above the drawbridge. Here you'll find two more circular carvings, one of which holds another HELHEIM POWER STONE (2/4) and another treasure (10/30), lying on the floor in one corner. The other circular carving is missing its power stone. You'll have to look for it elsewhere.
Swim back along the corridor and down the shaft to the lower hallway. Follow it back to the room where you came in. Turn left there to exit the tower.
EXTERIOR OF THE RUINS: Be careful when you re-enter the open water. You may encounter another shark after exploring inside the tower.
Just above and to the left of the LEFT TOWER entrance (i.e., to the left as you exit, to the right when facing the ruins), there are two small, upright stones with niches carved in the front of them. Lying on the floor beside them is another HELHEIM POWER STONE (3/4). You may have spotted it earlier. (This screenshot shows its location.)
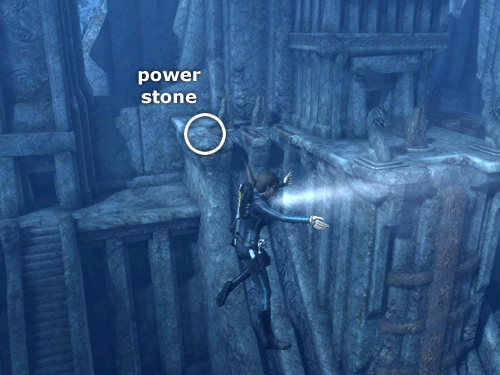
Pick it up and then place a power stone in each of the niches. (You can also wait until you've found all four stones to do this, but placing these two stones now will save a little backtracking.) Doing this activates part of the drawbridge mechanism, causing the carved runes on the face of the building to glow red.
On the flat ledge at the front of the building, between the carved serpents, there's another upright carved stone. This one has a metal wheel on it. The wheel opens the drawbridge, but it won't work until all four POWER STONES have been replaced. Swim past it for now.
Before entering the RIGHT TOWER, pick up few more treasures: On the ledge between the main building and the tower there is another pair of upright stones with niches, where you'll place the remaining two power stones. (If you like, you can place the third one in its receptacle now.) Behind the upright stones, lying on the ledge is another treasure (11/30). (It's circled in this screenshot.)
Now swim upward between the main building and the RIGHT TOWER. On the side of the main building is a small room with slit windows, supported by an angled stone buttress. (This screenshot shows the spot.) Some of the stone window bars are broken, enabling Lara to swim through. The treasure (12/30) is inside on the left.
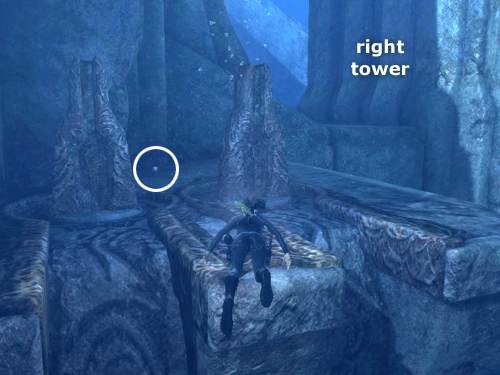
Finally, swim down and around to the base of the long staircase leading up to the entrance to the RIGHT TOWER. On this ledge, on the far right side of the building, you'll find another treasure (13/30). (Again, check the screenshot if you need a visual.)
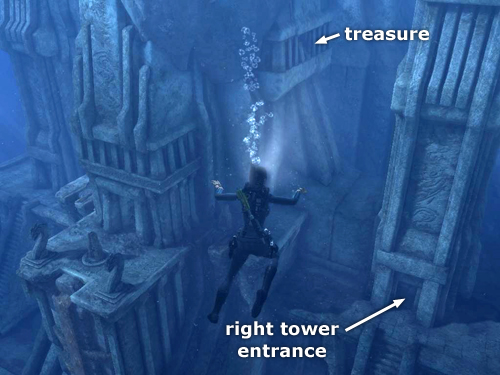
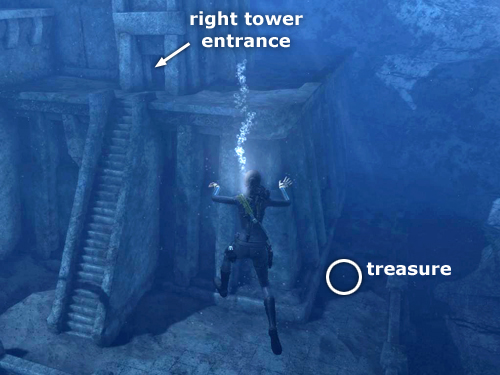
RIGHT TOWER: Swim back up to the tower and enter through the doorway at its base. Once inside, swim up to an air pocket where you can surface and climb out of the water. Smash the clay jar to get another treasure (14/30). Then climb the ladder to the level above. At the top, climb to the right and traverse along the narrow, stone ledge. Round the corner, pull up and sidestep to the right edge of the ledge. Then jump to the right to clear the gap and re-grab the ledge beyond.
Traverse along the next section of ledge around the corner. Again, pull up and step to the end of the ledge. This time jump to the right to grab the metal beam above. Pull up and walk to the end of it. Then jump to grab the ladder on the wall ahead. Climb to the top of the ladder and jump to the ledge behind. (Again, to do this, just press the Jump key with no direction keys or pressure on the stick.)
The jars on this ledge are empty. So ignore them and climb the next ladder. At the top jump to grab the metal beam behind Lara. Pull up to stand on it. Then jump over to the short beam projecting out of the wall ahead. Walk toward the wall and jump up to grab the handhold above. Jump up twice more to reach the wide ledge at the top of the room.
Claim the final HELHEIM POWER STONE (4/4) and smash the jar on the right to find a treasure (15/30). Turn to face the edge of the ledge. But before you climb down, hop over to the small, uneven ledge on the left to get another treasure (16/30) in one of the breakable jars there.
Hang from the edge of this ledge and drop onto the metal beam. Walk to the other end, hang from the left side and drop into the water below.
EXTERIOR OF THE RUINS (again): Swim out of the tower the way you came in. Watch out, though, 4 more sharks appear in the open water after you explore inside the tower. There may be another one as well, if you didn't kill it after emerging from the LEFT TOWER.
NOTE: Several players have reported not encountering these last 4 sharks. I'm not sure if this is a bug or the result of spending more or less time in this area.
Swim to the ledge above on the right (i.e., to the right upon exiting the tower, left if facing the ruins). Place the remaining power stone(s) in the niches. Doing this activates the right side of the drawbridge mechanism, causing the runes on the face of the building to glow red.
You should now have found and placed all four stones. Swim around to the front of the building and pull the metal wheel to open the drawbridge. Swim down to the bridge and into the main building.
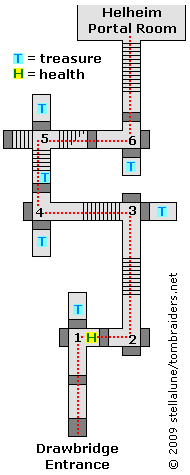
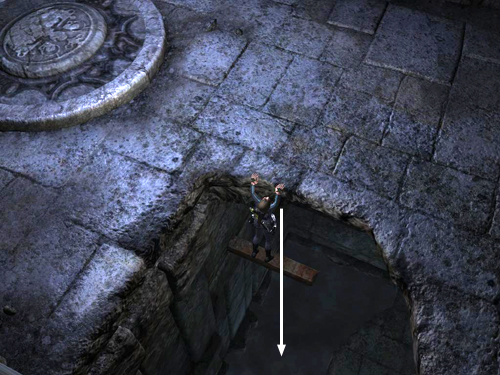
A cave-in appears to block the way in, but there's a small opening in the top right corner that Lara can squeeze through. Continue straight ahead along the flooded passageway. Swim through another small opening in the fallen rocks ahead. Beyond that is a four-way intersection (marked 1 on the map). To the left is a dead end. Straight ahead is a gap between the rocks. Swim through and pick up a treasure (17/30) on the floor beyond. Then swim back out and go to the left. Pick up a health potion from the floor and go through the space between the stones above.
Just ahead is another four-way intersection (2 on the map). Here, cave-ins block all but the left passage. So continue that way. The passage slopes upward at a broken staircase. There's a third four-way junction ahead (3). Two of the passages appear to be blocked, but there's a small gap near the ceiling on the right. Swim through to find another treasure (18/30). Return to the intersection and head forward up another staircase.
At the fourth intersection (4), go through the opening in the rocks on the left to retrieve a treasure (19/30). Then swim back out and continue forward past a spot where the hallway is partially blocked by rocks. Just beyond these rocks, before the next short staircase, look down on the right to spot another treasure (20/30) lying on the floor.
Continue up the passage to the fifth intersection (5). Straight ahead, through a gap in the rocks near the ceiling, you'll find yet another treasure (21/30). Get it and swim back out to the intersection. Turn left and swim past more broken stairs and through another opening in the fallen rocks.
At the next junction (6), swim through the opening in the rocks on the right. Pick up the last treasure (22/30) in this area and then swim back out to the main passage. Continue straight ahead, past one more pile of rocks, to a long staircase that leads up out of the water.
Cinematic: Lara ditches her now-depleted scuba tank and enters the large room ahead. Glowing red glyphs decorate the HELHEIM PORTAL, which is flanked by sinister-looking serpent statues. As Lara takes in the sight, Natla flies down from above. She uses her special powers to manipulate the portal's puzzle lock. Then, having done her part, she gives Lara a half-smile, inviting her to complete the task. Apparently not wanting to wait around to get hammered, Natla takes flight once more and disappears.
HELHEIM PORTAL ROOM: Before attempting to cross the pool to the portal, pick up a few goodies on this side. There's a health potion on the floor at the front left corner and 2 treasures (23/30 and 24/30) in jars, one at the front of the ledge on the right, one in the back left corner among some other jars.
Also, take note of the elaborate symbol carved in the stone on the right outer edge of the door frame. (It's on the left when facing the door. This screenshot shows the spot.) When Lara approaches it, it glows blue and emits a resonant sound, indicating that her Thor powers can activate it. However, it's not necessary to do that now. This is only one of a series of symbols you'll need to activate in sequence later on.
While you're nosing around on this ledge, Yeti and Viking thralls begin to rise from the large eitr pool. These creatures continue to respawn as long as you stay on the ledge and shortly afterward. To make your trip across the pool easier, stand near the edge of the ledge and use Mjolnir to clear out any thralls lurking below before dropping down. It takes about three blasts to kill a yeti and only a single hit for each Viking.
NOTE: I generally play on the medium difficulty setting, but according to a few other players, if you choose the hard setting, the thralls will continue to respawn as you cross the pool, though according to Fiona, you may be able to stop the respawn by letting Lara die and reloading the previous checkpoint.
If any of the Viking thralls gets stuck beneath the ledge, try dangling Lara from the edge to draw it out. Then pull up and blast it. Or step close to the edge until you're able to get a target lock. Then chuck a grenade. Once you've taken out a few yetis and any Vikings in the immediate vicinity, begin making your way across the pool toward the exit. If you stay here on the ledge, the thralls will just continue to respawn.
CROSSING THE POOL: Drop down onto the ledge below the one at the entrance. Smash the shiny jar to get the treasure (25/30) inside if you like. (This series of screenshots shows the path across the pool, along with the locations of the various treasures.)
Turn around to face out across the pool. Kill any thralls that have materialized and then jump onto the fallen column that runs along just above the toxic water toward the tiny island ahead on the left. Walk along the column (you can jump forward or press Sprint to scurry along) and then jump onto the island. One of the jars here contains a treasure (26/30), and there's another glowing symbol on the back of the support column here. Make a note of its location. You'll be back soon. Jump back to the column, cross over it and jump back onto the big ledge where you first dropped down.
NOTE: From this point on, I encountered no more thralls in this area, but I've heard from other players that thralls continue to respawn throughout your explorations here. Maybe this is different for various versions of the game. I'm playing the PC version.
Turn away from the wall and jump onto the short, vertical column sticking up out of the water ahead and to the right. Turn right to face the low wall and then jump forward to grab it. Climb along the narrow stone ledge toward the left end of the wall. Make sure Lara is hanging from the corner of the ledge before jumping back to grab the narrow, brownish column behind her. Climb up the column and perch on top of it. (Again, check the screenshots if necessary.)
Pivot on top of the column to face the slightly tilted platform and jump forward to grab the edge of it. Pull up and claim another treasure (27/30). Then jump from the tilted platform to the top of the next brown column, which sticks up out of the small island below. Press Crouch to go from perching on top of the column to hugging it around the middle. Press Crouch again to let go and drop to the floor. Pick up the health potion and break the shiny jar to get the treasure (28/30) inside.
Now move to the other side of the ledge and carefully jump over to the next small island. This is a fairly long jump and it's easy to miscalculate and slip into the pool. So be sure to start on the right side of the ledge, where the gap is a little smaller, take a running jump and hold the Jump key to keep Lara in the air for that crucial extra fraction of a second. Pick up the health potion and, again, make a mental note of the glowing symbol on the column.
From here, jump to the next small island ahead near the wall, where you'll find a pair of clay jars, one of which holds a treasure (29/30). Get it, jump back to the previous island, and then carefully make the long running jump back to the larger island with the column sticking out of it. Again, try and make the jump on the left side where the gap is a little smaller and hold Jump to keep Lara in the air a little longer.
When you reach the larger island, go to the right side and jump onto the angled column sticking out of the water. Walk to the upper end of it and jump forward to grab the edge of the light-colored stone wall. Pull up and walk to the right end of it. Jump from there to grab the ledge ahead. Pull up and approach the HELHEIM PORTAL.
Cinematic: With a powerful pyrotechnic display, Lara uses Mjolnir to open the exit.
†UPDATE HISTORY: 12/20/08 - First draft posted online.
2/23/09 - Added the map of the flooded passages between the drawbridge and Helheim Portal room.
5/6/09 - Just a few minor changes for accuracy and clarity.
4/6/11 - Added note about respawning thralls in the eitr pool area near the end of the level, thanks to tips from Marie and LaraCroftBaby.
11/20/14 - Added note about stopping thrawl respawn by killing Lara. Thanks to Fiona L. for that tip.
WAS THIS WALKTHROUGH HELPFUL? If not, I apologize and invite you to contact me with any questions. If you need help right away, I recommend the r/TombRaider subreddit. Other fan-run forums are listed at tombraiders.net/stella/community.html. If this site was useful, please consider supporting it financially or in other ways. For details, visit tombraiders.net/stella/support.html. As always, I welcome your corrections/suggestions. Thank you!
Copyright © 2008- - Stellalune (). All rights reserved. The screenshots and videos included here were made using Fraps. Feel free to copy or print this walkthrough for personal use. By all means, share it with friends, but please include this credit line so people can send me their feedback. No part of this walkthrough may be reproduced on another site without permission. As an Amazon Associate I earn from qualifying purchases. Follow this link for details about this site's advertising and privacy policy.
Stella's Tomb Raider Site: tombraiders.net.