IMPORTANT: If you haven't already done so, you may want to review the INTRODUCTORY NOTES on the storyline, controls, treasures/relics and saving/checkpoints. These appear at the start of the PROLOGUE walkthrough.
As always, I highly recommend that you do not rely exclusively on the autosave. Instead be sure to save manually at least once or twice each level. Then, if you miss something or run into a bug, you can reload rather than having to replay the entire level. Many common bugs are documented in this walkthrough. They are in hot pink text, like this, so they're easy to spot. I have also included an overview of major bugs without game spoilers. However, not every potential problem is covered here. So be safe; save often in new slots. In case you need them, Underworld Save Files for PC, PS3 and Wii are available.
Stella's Tomb Raider Underworld Walkthrough - For Windows PC, PlayStation 3, Xbox 360 and Xbox One
(PlayStation 2, Nintendo Wii and DS - click here)
LEVEL 4: SOUTHERN MEXICO - PART 2: XIBALBA | Updated: 4/30/09(†) |
Health Items: 4 Treasures: 19* Relics: 0 Keys/Puzzle Items: 1
*There are 50 treasures in the entire Southern Mexico chapter. Nineteen of these can be found in this level. They are numbered 10/50 through 28/50 below.
NOTE: The Southern Mexico map at right (same as the one in the previous level) shows the general layout of this area. It is not completely accurate or to scale, but it shows the various connecting roads and the main points of interest. The bug note referred to in the map appears in the Unnamed Days walkthrough.
FIRST CALENDAR PUZZLE (Jaguar Head): After the cut scene, approach the headless, carved jaguar at the center of the circular calendar and press Interact to place the JAGUAR HEAD artifact where it belongs. This unlocks the puzzle so you can manipulate the parts.
NOTE: If you've just come to this walkthrough and are missing the JAGUAR HEAD, you'll need to backtrack a bit to find it. Exit the building and drive away, taking the left fork where the path splits. This road leads back through the tunnel to the start of the level, where you'll find the item you need. Refer to the Unnamed Days walkthrough for details.
Notice how the calendar is constructed of three concentric wheels. The large, outer wheel is controlled by a separate handle, with a golden skull on top. The jaguar handle at the center moves the inner and middle wheels simultaneously. Each wheel has a raised obsidian symbol on one segment. The goal is to turn the wheels to align all three obsidian symbols at the outer edge of the circle, pointing out toward the BALL COURT. (This set of screenshots shows the process.)
First, grab the jaguar handle and walk around in a circle to turn it so the obsidian symbol on the middle wheel lines up with the symbol on the outer wheel. (The inner wheel will also move, but this doesn't matter.) There's an audible "chunk" when the symbol is positioned correctly.
Next, grab the golden skull handle and step to the left (Lara's right) to turn the outer wheel. This separates the wheels so you'll be able to turn the inner wheel independently. It also moves the obsidian symbol on the outer wheel away from its correct position but only temporarily.
Go back to the jaguar handle and turn it to rotate the inner wheel so the obsidian symbol lines up with the one on the middle wheel. Again, the mechanism clicks when you align the symbol correctly. Finally, return to the skull handle and move it back to the right (Lara's left) to align the obsidian symbol on the outer wheel with the other two symbols and lock the wheels in place.
When the puzzle is solved in this way, a cut scene shows a series of huge blocks rearranging themselves on the ball court below.
You can't get down to the BALL COURT from here. So roll back out through the low opening the way you came. There are 2 black panthers waiting for you outside. You may be able to crouch in the low opening and shoot them from safety, but if they run off and hide you'll have to venture out to get their attention. If you like, you can roll out, dope them both with tranquilizers and then use manual aim to finish them with your pistols. Or, sprint back to the motorcycle and use it to run over the cats. Again, donuts are especially effective.
PATH TO THE CROSSROADS: Get back on the motorcycle and ride away from the ruins on the track leading uphill and to the right. (The left path leads back to the building where you found the JAGUAR HEAD.) Not too far along there's a pit lined with spikes, presumably a trap set by poachers, blocking the road. Use the log ramp to jump the pit. To do this, either maintain your speed through the turn leading up to the pit and then accelerate onto the ramp; or, stop short of the ramp, back up to set up a straight run at the ramp and then hold the brake, rev the engine and then release the brake to zoom forward.
A little farther along the road, there's a second similar spike pit. Instead of trying to jump across, avoid it by steering onto the elevated dirt track that runs along the left side of the pit.
After the two pits, just keep following the road. Soon you'll come to a stone wall where the road turns to the right. Just beyond that is a man-made tunnel. Pause here to get a treasure (10/50) from one of the breakable jars on the right. Continue by motorcycle through the tunnel and on a short distance to where several tracks intersect.
CROSSROADS: You'll return here several times during your explorations in this level. Refer to the map if you get mixed up. If you're not collecting treasures, turn left onto the path that leads beneath the high, NATURAL STONE ARCH. (Skip the next section and pick up the walkthrough below at the section "PATH TO THE LARGE TEMPLE.")
TREASURES OF THE BALL COURT: Turn right toward the wide staircase leading down into the BALL COURT. You'll find a treasure (11/50) in one of the clay jars on the right side of the stairs. The next jar containing a treasure (12/50) is at the bottom of the stairs on the right. Now head to the right and work your way around the perimeter of the court, breaking pottery and picking up three more goodies as you go: one treasure (13/50) in the corner just ahead, another treasure (14/50) in bushes near the next corner, and one more treasure (15/50) on the far side of the court just below and to the right of the high balcony. (These screenshots show all five treasures in this area.)
Drive back up the stairs out of the BALL COURT. At the CROSSROADS, go straight forward through the NATURAL STONE ARCH.
PATH TO THE LARGE TEMPLE: Beyond the stone archway, the path splits. If you're treasure hunting, take the fork to the left and up the steep hill. At the crest of the hill, on the right near the stone wall, is a jar with a treasure (16/50) inside. Just before the track slopes down sharply to the right and rejoins the main path, look ahead to spot a large tree growing in the corner formed by two stone walls. Walk into the bushes just to the right of that tree to find another treasure (17/50). (These screenshots show the locations of the two hillside treasures.) Get back on the bike and head down the hill toward the main path.
As you approach the ruins ahead, a panther leaps down into the road behind you. You can try and run it over if you like. Or, if you want a safe spot from which to shoot, try the ledges at the mouth of the tunnel or the steep slope on the left when facing the tunnel.
NOTE: If you take the upper path at the fork in order to get the treasures, you may not encounter this panther. If you want to kill it so it doesn't surprise you later, you may need to backtrack along the lower path a bit, then return toward the tunnel opening in order to make the panther appear.
In any case, the ruins prevent you from driving any farther. You'll have to dismount here. Climb up into the dark tunnel and follow it to the end.
EXTERIOR OF LARGE TEMPLE WITH WIDE STEPS: A man-made stone archway overlooks more ruins. There's a tempting health potion sitting out in the open on a rectangular platform, but unless you're itching for a fight, don't just rush out to get it. Instead wait at the top of the stairs and allow the panthers and poachers in the area ahead to argue among themselves for a while. When things settle down, you'll have fewer enemies to deal with. (There are 3 panthers and 5 men in all, but if you let them kill each other, you should only encounter 3 men and one cat.)
If you still have tranquilizer darts left, you can improve your odds quite a bit by tranquilizing some of them while you fight the others. Remember that you can finish off tranquilized enemies using pistols in manual aim mode.
You may also be able to pick off one of the poachers (the guy below on the right) from the top of the stairs using the pistols with precision aim. The targeting reticle will be gray, not red, at this distance, but if you can see blood when your bullets connect, then you're doing damage.
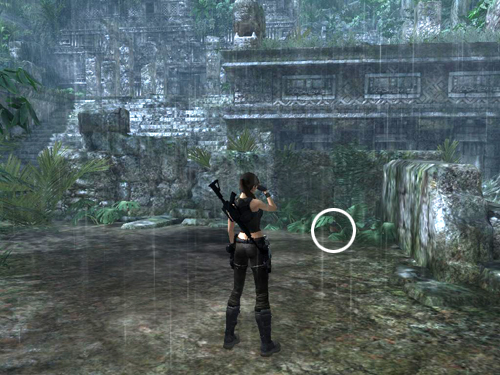
After that, you'll have to come down and fight. You may want to circle around behind the low wall on the right to take out the first poacher if he's still alive. There's another health potion beneath the broad-leafed plant growing at the corner where the two low walls meet. (This screenshot shows the spot.)
After you've taken out the man in on the ground, if the second hunter is playing sniper up on the high ledge, try and shoot him from below. When those two are dead, you can safely pick up the health on the platform.
Then head up the stairs to get the remaining panther's attention. Back down the stairs, shooting as you go. Or run and jump onto the platform where you got the health and kill the cat from there. Now there should only be one more poacher up above. He'll hide behind the wall on the right, so you may have to go back there to flush him out. You'll find another health potion just at the top of the stairs on the left.
There are also several breakable jars with treasures in this area: One treasure (18/50) is tucked into an alcove below where the sniper-poacher was standing (i.e., to the left of the stairs leading up to the temple). After picking it up, you may want to grab the gold-bound wooden pole leaning against the wall to the right of the stairs. You'll need the pole to get the next treasure (19/50), located on top of one of the square pillars on the right side of the terrace at the top of the stairs. Just plug the pole into the hole on the side of the pillar and use it to reach the jar. There's another treasure (20/50) on this side of the terrace near the edge of the ledge overlooking the area below. And one more treasure (21/50) can be found in the opposite corner of the terrace, on the far left when facing the temple. (These screenshots show the locations of all the goodies.)
CLIMBING INTO THE LARGE TEMPLE: In order to get inside, you'll need one of the wooden poles available in this area—either the one you used to reach treasure #19 or the one sticking out of the square column near treasure #21. To remove a pole from its socket, just hang from it, move as close as possible to the column, face the column and press Interact to yank the pole free.
There are three square pillars with holes for poles at the front of the temple. Once you have a pole, take it to the pillar on the left (when facing the temple), and plug it in. Climb onto the pole and jump up to grab the handhold above. (These screenshots show where to go.) Climb around to the left and jump up to grab the handhold above. Climb to the left and jump to grab the next pillar. Climb around to the left so Lara's back is toward the temple. Then jump back to grab the nubby stone handholds on the wall.
Climb along to the right as far as you can, then jump past the area with no handholds to grab the bumpy stones beyond. Climb to the right until you once more run out of handholds. Then jump back to land on the horizontal stone beam connecting the nearest square columns.
Turn so the temple is on Lara's left and walk to the end of the beam. Then turn right and jump to grab the column ahead. Traverse to the left and pull up onto the short beam. Walk to the end and jump to the next short beam jutting out from the column ahead on the left. Hang from this beam, traverse to the left past the column and pull up on the other side. Now jump to the beam protruding from the temple wall just ahead. Walk toward the wall and jump straight up to grab the handhold above. Climb around the corner to the right and drop down twice to reach the ground.
The floor ahead looks dangerously cracked, but it's safe. Go forward and break the clay jar to get another treasure (22/50). (Its exact location is shown in the last of the previous set of screenshots.)
To get out of this room, grab the lower of the two poles sticking out of the square column. Jump up to stand on it and then jump up once more to grab the higher pole. Swing and jump to grab the longer horizontal pole ahead. Climb on top of it and then walk to the left end. Turn to face the slightly higher ledge ahead and jump straight up to grab it. Pull up. (These screenshots show the sequence.)
Turn around to spot another treasure (23/50) on top of the pillar with the two poles. Jump across to get it and then jump back to this ledge.
INSIDE THE TEMPLE – UPPER LEVEL: Go to the left. Grapple the metal ring, step back off the ledge and let out the cable to lower Lara to the floor. Turn around and cross the room. Just to the right of the doorway into the next room, there's a rough hole in the wall. Inside you'll find another breakable jar containing a treasure (24/50).
In the next room, climb onto the rectangular ledge straight ahead. Turn around and jump to grab the edge of the L-shaped ledge next to the doorway. Pull up and get another treasure (25/50) from one of the jars. Then vault onto the ledge above.
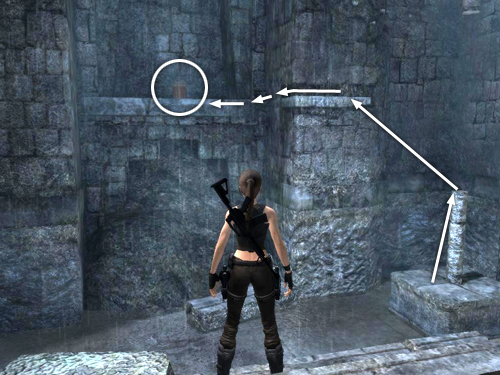
OPENING THE WAY TO THE LOWER LEVEL: This ledge overlooks the room with the big, square carving on the floor. Move to the left end of the ledge so Lara is facing the metal ring you used earlier. Grapple the ring and then walk toward the right end of the ledge, so the cable snags on the carved stone block perched on top of the square pillar between Lara and the ring. Tap Interact repeatedly to yank on the cable, gradually nudging the big, square block off the pillar, until it crashes through the floor, opening a gaping hole into the room below. (These screenshots show the process.)
A flock of bats flies up out of the hole. So deal with them before climbing down to the floor.
Move to the edge of the hole and step down into the slight depression to the right of the square pillar (shown in the first of these screenshots). Hang from the edge of the hole and drop to grab the narrow stone ledge below. The rain makes it slippery, so you'll have to press Interact for a saving grab to keep Lara from losing her grip. Climb all the way to the left. Then drop once more to grab the rough handholds on the wall directly below. Again tap Interact to hang on. Climb down and around to the left until Lara's back is facing the skinny vertical column. Jump back to grab it and then slide down to the floor. (Check these screenshots if you need a visual.)
INSIDE THE TEMPLE – LOWER LEVEL: Climb up to the altar and grab the STONE HEADDRESS, which looks like a skull with golden teeth and eyes. Then turn around and shoot the small spiders that swarm out onto the floor below.
From the altar you can see a clay jar on the high ledge on the opposite side of the room. If you want the treasure (26/50) inside, grab the short broken pillar in the corner below and to the right of the ledge with the treasure. Climb on top of it and jump to grab the handhold to the right of the ledge. Climb around the corner to the left and jump to grab the ledge holding the treasure. Traverse to the left and pull up. (This screenshot shows the climb.) Get the treasure and then drop to the floor.
CLIMBING OUT: To reach the opening high above, begin by grabbing onto the longer broken column in the corner to the right of the altar. Climb up to perch on top of it. Jump to grab the corner handhold on the square support pillar ahead. (These screenshots show the entire sequence.) Jump straight up to grab the smaller handhold above and climb to the left. Jump to the left to grab the next handhold and traverse past the gap in the ledge all the way to the end. Drop down to grab the handhold below and climb around the corner to the left.
The confined space here can make the camera a little hard to control, but if you move it so you're looking down on Lara from above her right shoulder, you'll be able to see where to go. First drop to grab the nubby stone handholds directly below. Then climb up and around the corner to the left. Continue diagonally upward and to the left until you can't go any farther. Jump straight up to grab the handholds above. Then continue climbing around the next corner to the left.
Climb along the rough handholds to the left until you can't go any farther. Jump to the left to reach the next set of handholds (just below and to the right of a carved stone orb resembling an eye). Climb down the rough wall continue climbing to the left. These handholds take you all the way around to the front of this wall, so the middle of the room is now behind Lara.
Climb to the left as far as possible. Then jump to the left to grab the broken column extending from the ceiling. Move the camera behind Lara so it's pointing toward the rough stone handholds to the right of the ledge where you found treasure #26. Jump to grab those handholds and climb upward.
At the top of this section of rough wall, make sure you've climbed upward and to the left as far as possible. Then jump straight up to grab the narrow stone ledge above. This ledge is slick with rain, so you'll need to use the saving grab to keep Lara from falling. Once she's got a firm grip, climb then jump to the left to grab the next handhold. Again, use the saving grab to keep Lara from slipping. Traverse to the left until you can jump up to grab the ledge above, once more using the saving grab to hang on. Then pull up onto the floor of the room above. Whew! Good work.
The big, carved doors on the other side of the pit don't open, but you can get out by climbing through the hole above the left door.
BUG NOTE: It is possible to climb out of this room by grappling the metal ring and climbing up, but I don't recommend it. Doing this may contribute to the bug that prevents you from finishing the next level. This method may be useful, however, if you missed treasure #23 and want to get it without having to climb back into the temple from outside. If you do that, just be sure to return to the room with the hole in the floor and exit the temple in the recommended way. (For details, please see the footnote at the end of this walkthrough.)
EXTERIOR OF LARGE TEMPLE WITH WIDE STEPS (again): When you climb through the hole in the door, you'll find 3 more poachers waiting outside. You'll have to fight your way past them to reach the tunnel that leads back to the road.
NOTE: If you didn't encounter a panther on this road as you approached, you may meet it as you leave. And if you missed the treasures along the right (uphill) branch of the road, you can get those now. (See treasures #16 and #17, above, but reverse the directions since you're now coming from the opposite end of the road.)
ROAD TO THE SECOND CALENDAR PUZZLE: Follow the road up the hill and through the NATURAL STONE ARCH to emerge near the CROSSROADS. The BALL COURT is straight ahead, but you're not headed there yet. Turn left and follow the dirt track deeper into the jungle.
The dirt track twists and turns, and there's one spike pit that you'll need to jump using the log ramps. A little farther on the path splits around a clump of rocks and foliage and then converges again and continues to the right. After this, the track curves around to the right and runs beneath an odd-looking stone overhang. A little farther on, a panther darts into the road. Shoot or run over it.
The road splits and converges again before you reach the edge of the next set of ruins. When you see the buildings ahead, you may want to ditch the bike and walk forward, so as not to attract unnecessary attention. Or, if you prefer, ride in and start shooting.
SECOND CALENDAR PUZZLE – BUILDING EXTERIOR: There are 3 poachers up on the ledges in front of the building and a panther on the ground below. You'll have to fight them all. I suggest dealing with the panther first. Either drive in and run it down or advance cautiously, get a lock on it and back up along the road firing. The cat will follow Lara and she'll be able to fight it outside the range of the poachers' guns.
When fighting the poachers, you can take cover in the bushes to the right of the ruins, behind the low stone wall that runs along the side of the road parallel to the ruins, or just use the ledges on which they're standing as cover. They can't shoot down at a steep angle. After killing the first poacher, you can also circle around to the far side of the building and hide behind the rocks there to kill the second poacher.
IMPORTANT: You are about to enter the building to solve the SECOND CALENDAR PUZZLE. When you do, the exit from this area will open, and you'll have a limited amount of time to get there. So if you have missed any of the 26 treasures available so far, now is the time to go back for them.
Also, before entering the building, take a few minutes to move the motorcycle into position for the speed run you'll be making shortly. On the side of the building nearest the road where you drove in, there's a huge hole in the wall. If you park the bike just below this hole, facing the road (as shown in these screenshots), Lara will be able to jump to the ground, get on the bike and zoom away when the time comes.
When you've got the bike positioned beneath the hole in the wall, run around to the other side of the building and climb onto the broken stairs. Pick up a health potion at the corner of the ledge near where the second and third poachers were standing. In the corner to the left of the gate leading into the building there's a breakable jar with a treasure (27/50) inside.
To get inside begin by grabbing the carved stone block and dragging it beneath the golden socket on the wall (as shown in the first of these screenshots). If you position the block so there's a little space between it and the wall, you won't have to move it again. Pick up the wooden pole, climb onto the block, step to the edge and press Interact to place the pole in the socket. Lara's weight pulls the pole down, raising the gate, which is just to the left. Turn so Lara is facing that way. Swing around the pole and jump forward to land near the gate. Quickly run or roll through before it closes.
I suggest you now save the game in a new slot. When you solve the puzzle, you'll have a limited amount of time to reach the exit. If you fail, you may want to reload and try again. (The alternative is covered below.)
XBOX 360 ACHIEVEMENT/PLAYSTATION 3 TROPHY: To unlock the Speed Demon I achievement/trophy, you must complete the timed run (from the end of the cut scene that shows the gate opening to the start of the next cut scene) in under 45 seconds. It doesn't matter whether you race from the second calendar puzzle to the gate or from the first calendar puzzle to the gate (as described in the ALTERNATE PATH TO THE XIBALBA GATE section, below.) As long as you make it through in 45 seconds or less, it will count. In either case, you should save the game before solving the calendar puzzle that opens the gate. Then if you don't make it, you can reload, redo the puzzle and try again. Note that to unlock all four Speed Demon achievements, you must complete each of the speed runs in order during the same play-through. For more info, follow these links to the Xbox 360 Achievements and PS3 Trophies pages.
SECOND CALENDAR PUZZLE (Stone Headdress): Before starting on the puzzle, go forward to the far right corner of the room. On the floor next to the huge hole in the wall, you'll find a jar containing the last treasure (28/50) in this area.
Solving this calendar puzzle involves the same basic steps as the previous one. First, stand next to the small, square hole in the outer wheel and press Interact to place the STONE HEADDRESS there and raise the skull handle from the floor. This unlocks the puzzle so you can manipulate the parts.
NOTE: If you've just come to this walkthrough and are missing the STONE HEADDRESS, you'll find it in another building. To get there, exit through the hole in the wall, get back on the motorcycle and drive away from this building the way you came. Turn right at the CROSSROADS and drive beneath the NATURAL STONE ARCH. Pick up the walkthrough above at the section titled "PATH TO THE LARGE TEMPLE."
Grab the jaguar handle at the center of the dial and turn it so the obsidian symbol on the middle wheel lines up with the obsidian symbol on the outer wheel. Now take hold of the skull handle and step to the left (Lara's right) to turn the outer wheel and separates the inner wheel so it can be turned independently. Grab the jaguar handle again and turn it to align the symbol on the inner wheel with the one on the middle wheel. Return to the skull handle one last time and move it back to the right (Lara's left) to line up the symbol on the outer wheel with the others, solving the puzzle. (Since this is so similar to the FIRST CALENDAR PUZZLE, above, I have not included screenshots.)
Cinematic: The elaborate mechanism beneath the ball court activates once more, raising a massive statue of a two-headed snake flanked by huge, fire-breathing serpents. The floor between the rows of snakes then retracts, revealing the exit from this area.
TIMED RUN TO THE EXIT: As soon as it is fully open, the exit starts to close. You'll have a little less than a minute to race back around to the BALL COURT and down the ramp between the fire-breathing serpents. So as soon as you regain control of Lara, release the handle and start running.
Sprint away from the puzzle and veer to the left toward the hole in the wall. Jump through the hole to land on the ground next to the motorcycle, which you should have already parked below the opening. Get on and start riding. Follow the twisting track back toward the CROSSROADS, avoiding obstacles and jumping over the spike pit with the log ramps. Go as fast as you can without crashing.
When you reach the CROSSROADS, turn left toward the BALL COURT. Race down the stairs and straight on down the ramp between the huge, stone snakes. Keep going as fast as you can to clear the deep pit at the bottom of the ramp. If you've made it in time, you'll see the cinematic sequence described below.
ALTERNATE PATH TO THE XIBALBA GATE: If the exit closes before you get there, you can either reload your saved game before the SECOND CALENDAR PUZZLE and try again or drive back to the FIRST CALENDAR PUZZLE and use it to re-open the exit. To reach the first puzzle from the BALL COURT, drive up the stairs and turn left at the CROSSROADS. Continue along that road until it forks. Take the left fork toward the ruins. (The right fork leads back to the beginning of the level.) When solving the first puzzle again, you'll only have to turn the outer wheel. The rest will be done already. When you do this, the exit will re-open and you can try the timed run again from here. There will be 2 panthers waiting outside the calendar room. Just ignore them, get back on the motorcycle and race back to the BALL COURT.
In spite of the two spike pits, I found the ride from the first puzzle to the exit easier than the one from the second puzzle to the exit. If you find steering the motorcycle through tight turns at high speed a bit challenging, you may want to solve the second puzzle, let the exit close, return to the first puzzle, save and try it from there. Then if you fail on that run, reload your save and try again.
NOTE: If you can't manage the timed run and you're playing the PC or PlayStation 3 game, you're welcome to download a save file for the start of the next level. Instructions are included with the downloads.
Cinematic: When Lara makes it through the exit, the doors close behind her and she skids to a stop just short of another deadly pit. She pauses to catch her breath then begins examining the architecture. (That's our girl.) Deciphering the carvings she reads, "The Place of Fear. . . . It's definitely Xibalba, the Mayan land of the dead."
†UPDATE HISTORY: 12/8/08 - First draft posted online.
12/10/08 - Added link to PC save file for the checkpoint following the timed sequence.
12/17/08 - Added map graphic and corrected a few typos, thanks to Gerry N. and Greg H.
2/13/09 - Added Xbox 360 Speed Demon achievement.
4/25/09 - Made numerous small changes for accuracy and clarity. Also incorporated several suggestions submitted by other raiders, who are credited below.
4/30/09 - Added tranquilizer tips, thanks to a suggestion from Mike J.
ACKNOWLEDGEMENTS: Thanks to the following players, without whose help this walkthrough would not have been possible: Andy M., Tig, Charlie D., Dolgothir, Mike J., Newlivesforall and sps.
ALTERNATE EXIT FROM THE STONE HEADDRESS TEMPLE: It is possible to climb out of temple where you obtain the STONE HEADDRESS by grappling the metal ring and climbing up. (See this page of screenshots for instructions.) This can be useful if you missed treasure #23 and want to get it without having to climb back into the temple from outside.
However, be warned that if you leave the temple this way, instead of crawling through the opening in the big carved doors, it may prevent the level from working as designed. The poachers do not appear in front of the temple, which makes things a little easier. But, on the down side, several players have theorized that doing this may contribute to the terrible bug at the beginning of the Midgard Serpent section. Eidos support so far has not recognized this as a possible cause for the bug, but if you want to be absolutely safe, use the opening in the doors to leave the temple.
WAS THIS WALKTHROUGH HELPFUL? If not, I apologize and invite you to contact me with any questions. If you need help right away, I recommend the r/TombRaider subreddit. Other fan-run forums are listed at tombraiders.net/stella/community.html. If this site was useful, please consider supporting it financially or in other ways. For details, visit tombraiders.net/stella/support.html. As always, I welcome your corrections/suggestions. Thank you!
Copyright © 2008- - Stellalune (). All rights reserved. The screenshots and videos included here were made using Fraps. Feel free to copy or print this walkthrough for personal use. By all means, share it with friends, but please include this credit line so people can send me their feedback. No part of this walkthrough may be reproduced on another site without permission. As an Amazon Associate I earn from qualifying purchases. Follow this link for details about this site's advertising and privacy policy.
Stella's Tomb Raider Site: tombraiders.net.