LEVEL 19: VON CROY'S APARTMENT |
Updated: 1/16/07(†) |
Items: 7 health items, Von Croy's Jackal Walking Stick
Weapons & Ammo: 25+ ammo items, Rigg 09 and Viper SMG automatic
Enemies: "The Cleaner"
Upgrades: lower body
NOTE: Several players have reported various bugs in which "The Cleaner" either doesn't show up at all or can't be driven off no matter how much you shoot at him. I haven't been able to reproduce this, so I'm not sure what causes it. If you're having this problem, I'd recommend patching your game and/or playing the level following the sequence suggested here. If you have the PC or Macintosh game, you could also download a savegame file for a point after you encounter the bug. The savegame page includes a link to detailed instructions for downloading and installing the files.
WERNER'S PLACE - DOWNSTAIRS: You begin the level without weapons, though you still have whatever ammo and health you've collected. The Obscura Painting is gone (I believe Kurtis lifted this from Lara's backpack in one of the final cut scenes in the previous level), but you now have a mysterious crystal shard that wasn't there before meeting Kurtis. An update has been made to the notebook as well: "Check out Von Croy's apartment for missing Obscura Engravings."
Werner's apartment has obviously been ransacked, but at least the bad guys left plenty of bullets lying around. You can pick up quite a bit of stuff before The Cleaner shows up if you do things in order. Leave Von Croy's walking stick (near where you start) for last, since picking it up triggers the appearance of The Cleaner.
First, search the desk area to find more information about the Sanglyph and Lux Veritatis. Don't venture out into the foyer yet. The Cleaner has rigged laser tripwires to bundles of explosives. If Lara sets them off she'll be killed.
Move to the kitchen where you'll find 3 Rigg clips on the floor and counters and bandages behind the spiral staircase. Kick down the wooden door near the staircase for a lower-body strength upgrade. Pick up 1 viper clip and 2 Rigg clips in the hall beyond.
WERNER'S PLACE - UPSTAIRS: Go up the back stairs to the bathroom. Find more Rigg ammo here, plus a small medipack on the wall. Open the door to the bedroom. (It doesn't open from the other side, so if you come up the spiral stairs, you'll need to go back down and break down the other door to get into the bath.)
In the bedroom, search the writing desk for intel on the mysterious Cabal. Find 2 Rigg clips on the floor and 2 more clips in the closet along with a large health pack. When you've got everything, come down the spiral stairs to the kitchen.
DOWNSTAIRS AGAIN: Go around the dining table along the wall, grabbing the Rigg clip that isn't next to the gun. Before picking up the gun itself, go for the Rigg clip on the floor near the square column. A useful bug may enable you to take this clip an infinite number of times, as long as you don't pick up the gun first. When you have enough ammo, take the RIGG 09 and the 2 clips near it. (Not exactly state-of-the-art, but it'll have to do for now.) Pick up the clip near the square column one last time.
Save your game and then pick up Von Croy's JACKAL WALKING STICK. The Cleaner appears in the open doorway soon after. He fires on Lara and then takes cover behind the kitchen counter, the dining room table or the spiral stairs, depending on where Lara is standing as he enters.
He can dish out quite a bit of damage. So try and keep under cover yourself. Shoot when you can, and duck behind furniture or hide behind walls or columns when he's shooting. When he takes a bit of damage, he'll run back out into the hall. At this point you can finish exploring any of the apartment you haven't covered yet. When you're ready, follow him into the hallway.
BOOBY TRAPPED HALLWAY: He's disarmed the laser tripwires in the foyer but set others out in the hallway of the apartment building. These prevent you from going left, so turn right and go to the end of the hall. Break through the red emergency door. (If you try this before getting the upgrade, Lara will tell you she's not strong enough.) Enter carefully; there are more lasers to the left. Pick up another Rigg clip and a small medipack. Return to the hallway.
Go through the open door on the right. Pick up the Rigg ammo on the floor among the newspapers. Then get the second clip behind the loveseat. When you do this, The Cleaner blasts his way in through the wall. The loveseat offers a bit of cover, but the wall near the door is better. Shoot at him until he runs off again. Then follow him through the hole he made in the wall. Get the chocolate bar on the table and The Cleaner's VIPER SMG and 2 clips on the floor.
Step out into the hallway cautiously. There are new laser tripwires here now. You can't go to the left due to the zig-zagging lasers. So commando crawl to the right underneath the horizontal lasers. (Hold Duck then go into stealth mode. Use cursor keys to make Lara crawl along on her belly. Check the Controls page if you're not sure which keys to use.)
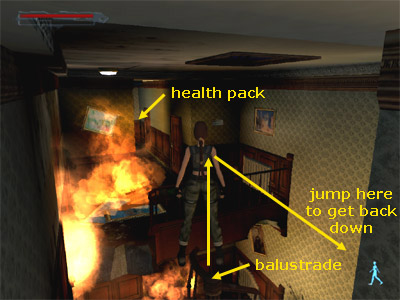
BURNING STAIRWELL: Turn the corner at the end of the hall. Bombs explode, destroying part of the staircase and setting fires here and there. Avoid these or Lara will be toast.
To get another small medipack, climb onto the balustrade at the corner of the demolished stairs (as shown in this screenshot). Jump over the railing to the right of the burning debris. At the end of the hallway, you'll find the health pack hanging on the wall. Get it, return to the stairwell and take a running jump over the railing onto the landing below and to the right.
From there, jump down to the next landing. Fire prevents you from entering the hall ahead, so hang from the floor at the break in the railing and drop to the floor below. Get the large health pack on the table and Rigg and Viper clips under the stairs. Jump up the stairs to clear the little piles of rubble. Where burning debris blocks the way to the right, turn left.
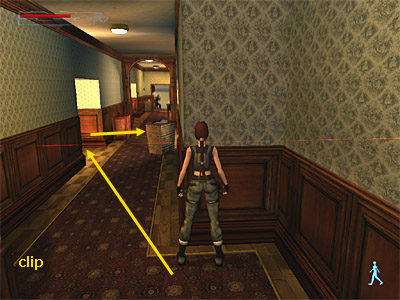
FINAL HALLWAY: As you pass the first set of explosives, the tripwires are armed and you can't go back. Stand in the corner (as shown in this screenshot) and scope out the situation before going further. The Cleaner is now at the far end of the hall. As you get closer, he'll start to shoot, but don't shoot back yet. Instead keep your weapon holstered and move toward him gradually, using the doorways for cover. You'll conserve health and ammo this way, and if you keep your weapon holstered Lara will be much more likely to run where you want her to go. If you move straight down the hall, The Cleaner's gunfire can knock Lara back into the tripwires, so you're better off moving carefully. Here's one strategy:
Starting in the corner where Lara is standing in the first screenshot, pick up the Viper clip on the floor just to the left. Then run along the hallway into the doorway on the left side. Pick up a Rigg clip. Then run across the hall to the next doorway, where you'll find another Rigg clip.
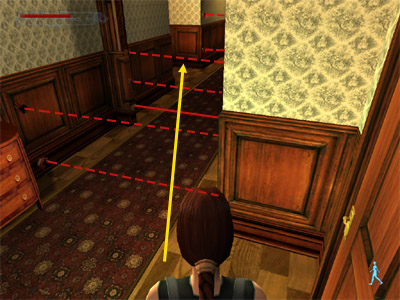
Step back a bit, while still staying in the cover of the doorway, and scope out the lasers ahead. Notice how the first set cycles on and off, as do the top two lasers in the second set. (I have drawn the lasers in this second screenshot. The broken lines show the ones that turn on and off.) When the first set of lasers turns off, get ready to run. As soon as the top two lasers in the second set go off, take a running jump to clear the bottom laser. Run on into the doorway on the left.
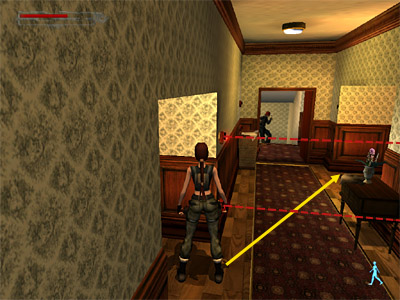
From this doorway, you can watch the next set of lasers (shown in this screenshot). When they turn off, run to the doorway across the hall, which is the last doorway on the right. Now you can draw your weapon. (The SMG makes for quick work here.) Sidestep to the left and shoot at The Cleaner as soon as you can aim. It only takes a few rounds to bring him down at this range. Just be careful not to run forward into the last set of lasers.
Cut scene: Lara comes downstairs to examine The Cleaner's body. She answers his ringing cell phone and recognizes Bouchard's voice. "Is she taken care of? Is she dead yet? We have to get back to Prague." Lara informs him she's not dead, but his little friend is. She vows to take care of Bouchard later. Finishing her search, she finds Mathias Vasiley's business card, which interestingly has the Lux Veritatis symbol on it. Guess it's time for a little road trip to the Czech Republic. Lara uses The Cleaner's remote control to disarm the remaining bombs and unlock his Jeep.... Some time later she arrives in Prague.
NOTE: In all the excitement of fighting and evading The Cleaner, you may fail to notice that several updates are made to your notebook during this level. Be sure to check them out when you get to Prague.
†UPDATE HISTORY: 1/16/07 - Reworked section on Rigg ammo bug thanks to various readers' input. Added small medipack in burning stairwell area, thanks to Crafty CC. Also added screenshots and rephrased a few other sections for clarity.
WAS THIS WALKTHROUGH HELPFUL? If not, I apologize and invite you to contact me with any questions. If you need help right away, I recommend the r/TombRaider subreddit. Other fan-run forums are listed at tombraiders.net/stella/community.html. If this site was useful, please consider supporting it financially or in other ways. For details, visit tombraiders.net/stella/support.html. As always, I welcome your corrections/suggestions. Thank you!
Copyright © 2003- - Stellalune (). I am eternally grateful to the members of the alt.games.tombraider newsgroup, whose contributions to this walkthrough are numerous. Thanks also to the developers of Fraps, the program used for all AOD screenshots. Special thanks to Crafty and alvinkhorfire for pointing out the medipack I missed, and to the many people who wrote to set me straight about the infinite Rigg ammo. Feel free to copy or print this walkthrough for personal use. By all means, share it with friends, but please include this credit line so people can send me their feedback. No part of this walkthrough may be reproduced on another site without permission. As an Amazon Associate I earn from qualifying purchases. Follow this link for details about this site's advertising and privacy policy.
Stella's Tomb Raider Site: tombraiders.net.