LEVEL 2: TRAJAN'S MARKETS | Updated: 9/18/01 |
Kills: 5* Items: 26, plus Laser Sight, Crowbar, Shotgun, Gold Coin, Valve Wheel, Mars Stone, Venus Stone and 3 Golden Rose Secrets**
COBBLED STREET: Enter the first two rooms on either side of the street. Each contains some tools, a wheelbarrow, etc., and a small box. Shatter the boxes with your pistols (crouch if necessary) and pick up the LASER SIGHT (it's only added to your inventory if you don't have it already) and CROWBAR. Both rooms have enticing ledges above. You can't reach them yet, though.
Continue down the street. The boarded-up door marked "Pericolo" (Danger) doesn't open. You'll get the goodies inside from the other side in a moment. Farther along the street, where it comes to a T, there are several barred gates. These, too, won't open yet, but you'll be back. For now, use the CROWBAR to pry open the metal door opposite the boarded-up door.
ABANDONED BUILDINGS: Enter and shoot the little box to get the small medipack inside. Climb the scaffolding. Turn toward the barred window (behind on the right if Lara is facing the tightrope). Take a standing jump from the corner of the ledge to grab the sill and pull up. Take the small medipack and jump back to the ledge. Walk the tightrope to the other side of the room. (You'll get the shotgun shells on the middle windowsill later.) Jump to the ledge below the windowsill. Climb onto the sill then cross the metal walkway. Turn right and take a standing jump to the angled ledge. From there, jump to the metal ledge ahead. Turn right and take a running jump to grab the sill with the shotgun shells. Repeat the running jump-grab to get back to the metal ledge.
Safety drop into the next room (i.e., hang from the doorway and drop onto the ledge below). Pick up flares and revolver bullets. Jump from the top of the coal heap to grab the square ledge in the corner. (Walk to the edge of the heap before jumping.) Pull up and enter the next room.
Cut Scene: An array of gears.
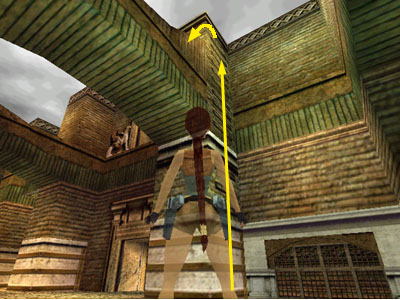
GEAR ROOMS: Safety drop from the ledge into an open area with several doorways, some barred. Take note of the three high ledges supported by square pillars. Scale the ladder on the back of the square pillar to the right of the center doorway. (See this screenshot if you have trouble finding it.) At the top, climb around the corner to the left, let go and slide onto the flat part of the ledge.
Turn right (the ladder is now on Lara's left) and take a running jump to the next ledge. Jump around the column to the small, square ledge and enter the FIRST ROPE ROOM. Pull the vertical rope (stand facing it and press Action) to operate the gear mechanism. Do this three times.
Cut scenes: Each time you pull, you see a brief cut scene of one of the gears being raised.
Exit and jump back to the middle ledge (near the ladder). Position Lara facing the windowsill between the two carved gryphons and take a running jump into the opening.
(NOTE: To set up this jump, walk Lara to the corner of the ledge nearest the opening where you want her to land. Angle Lara toward the opening then take one hop plus one walking step back. This will give Lara enough of a run-up. If she takes the running jump with only a hop back, she'll pause at the crack between the flat and sloping parts of the ledge and end up doing a standing jump instead. This will cause her to miss the opening and fall. The extra step backward will also make it so you don't need to press Action while jumping in order to land in the opening.)
Pick up the Uzi clips. Turn back toward the open area and take a diagonal running jump to the right to land on the third ledge. Jump around the column to the small, square ledge and enter the SECOND ROPE ROOM. Pull the rope once. If you've pulled the rope in the FIRST ROPE ROOM (above) three times, the gears will move.
Cut Scene: The mechanism is activated and the huge, circular door in the room below rolls open revealing a golden-armored centurion statue.
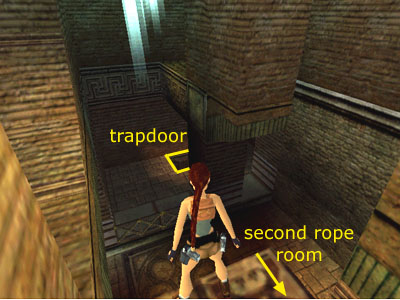
Pulling the second rope also opens a trapdoor below. This leads to secret #1. If, after pulling the rope once, you pull it again, this trapdoor will close. Pull the rope again to re-open it. This screenshot shows the location of the trapdoor. It's just below where you entered this area from the ABANDONED BUILDINGS.
Safety drop to the floor. (Lara loses a tiny bit of health.) Turn and go straight across the open area (over or around the low railing) and drop down through the trapdoor you just opened. Pick up a golden rose (secret #1, 4/36), plus regular and wide-shot shells. Climb back out.
BEHIND THE BIG GEAR: Cross the open area and go through the middle door. At the top of the small ramp you'll see where the huge gear rolled aside. To the left, opposite the edge of the gear, is an opening. Climb up and drop into a small room with lit torches. Use the CROWBAR to pry out the GOLD COIN. When you do, rats swarm out from behind the grate. Climb back out and run around until the rats disperse. (Or, run around to the left and climb onto the ladder where the rats can't reach Lara.) Then approach the big statue. Pick up a small medipack and revolver bullets. Then use the GOLD COIN in the receptacle in the base of the statue.
Cut Scene: A gate opens elsewhere.
Leave this room and go directly across the courtyard through the gate that just opened. This leads back out to the COBBLED STREET. Now the small gate in the white wall on the left is open. Go through and follow the alley around the corner. On the left is a room with a pool of water. Before entering, continue to the end of the street to get some revolver bullets.
ROOM WITH POOL AND FALLING WATER: Take a swim. Pick up a small medipack on the bottom of the pool on the left side. Notice the VENUS STONE gleaming enticingly on the other side of the gate. Surface behind the falling water and climb onto the purple ledge. Go through the doorway and approach the revolver bullets.
Cut Scene: A machine clanks to life, setting a mechanical head hovering above a claw-like base.
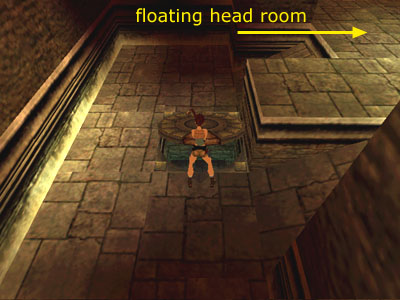
FLOATING MECHANICAL HEAD: The mechanical head shoots deadly rays from its eyes. If Lara is hit, it means instant death. There is an easy way to avoid being hit. Do not enter the room with the head. Instead, position Lara on the seam between the floor textures just outside the doorway so the room with the mechanical head is off to the left. Sidestep to the right away from the doorway. Then pivot to the left to face into the room. As long as Lara is on the seam in the floor, the mechanical head won't target her. (See these screenshots if necessary to get oriented.) Equip the revolver with laser sight and target the robotic head's eyes. When you shatter both eyes, the head is destroyed, leaving the MARS STONE behind. Drop down and pick it up.
Alternatively, enter the room with the head and turn left or right. Run forward and off the edge of the catwalk. Keep running around the metal armature surrounding the head and through the opposite door into the ROOM WITH RED MACHINE AND PIPES. Lara is safe here as long as she doesn't stand in the doorway. Use either of the blocks flanking the door for cover (as shown in this screenshot) and shoot out the mechanical head's eyes with the revolver equipped with the laser sight.
ROOM WITH RED MACHINE AND PIPES: Enter the small side room with the machine. (You will already be here if you used the alternate method for destroying the head, above.) Climb onto either of the blocks flanking the doorway and turn around to face the red machine. Stand at the edge of the block and jump straight up to grab the metal structure overhead. Pull up and jump to the top of the red machine. Here you'll find a golden rose (secret #2, 5/36). Drop down and return to the room where the head was.
Pick up the MARS STONE if you haven't already. On the far side of the room (under the entrance) you'll find revolver bullets and a trapdoor with a circular pattern on it. Position Lara at the edge of the trapdoor facing the orange wedge and press Action to open the door (as shown in this screenshot).
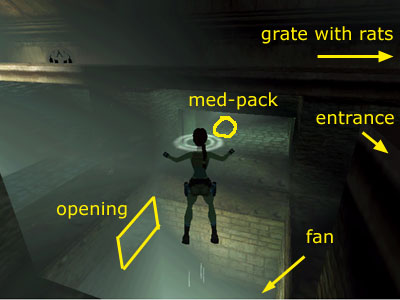
SEWERS: Drop through the trapdoor and follow the short passage to a T-shaped pool. One of the semi-circular grates (the one in the far right corner from the entrance) releases a swarm of rats when Lara walks past, but you can avoid it easily. At the junction of the various spokes of the pool, is an underwater fan. Beyond it, on the bottom of the pool is a small medipack. There are two openings on the side walls of the shaft that leads down to the fan. The current prevents you from reaching the lower opening. (This area is shown in the screenshot here.)
Make sure Lara's air meter is full. Then swim through the upper opening. Follow the twisting passage to a SMALL ROOM WITH A PIPE AND LIT TORCH. Pick up the shotgun shells and use your CROWBAR to pry the VALVE WHEEL off the pipe. Swim back to the T-shaped pool and return the way you came to the ROOM WITH THE RED MACHINE AND PIPES. (There's a ladder on the wall below the trapdoor so you can climb up.)
Press Action to place the VALVE WHEEL on the valve stem sticking out of the red machine. Press Action again to turn the wheel. There's no cut scene, but this turns off the fan back in the SEWERS. Return through the trapdoor to the SEWERS.
UNDERWATER TUNNELS: You may want to save your game before this next bit of complicated swimming. Swim down toward the now-inactive fan. Swim through the passage just above the fan grating. Continue down and forward. At the bottom, the passage widens. Head forward and veer left through the small, square opening. Continue to a small room where you can get air and a large medipack.
Jump back into the water and when you reach the wider, hexagon-shaped tunnel, go to the left. Follow the wider tunnel as it turns right. Ahead are two large fans. There's a small, square opening to the right of these fans. The current prevents you from reaching it. Let the current carry you. At the wall opposite the fans, swim upward until you can surface.
Climb out of the water and turn the wheel to deactivate the two fans. Swim back down toward the fans, then through the small, square opening to the right of them. Follow this passage through a series of twists and turns to another pool where you can surface. Climb out of the water and pick up the SHOTGUN and some shells. Start forward.
Cut Scene: A statue of a Roman centurion comes to life.
ANIMATED STATUE: The gate closes, leaving Lara trapped with the soldier statue. He's big and nasty. His sword not only slices but also shoots energy bolts. You can climb onto the windowsill (where the statue was). He can't reach Lara with his sword there, but he can still zap her. I found it easier to just keep moving around the open area while blasting him with the shotgun. Shoot him until he falls.
Cut Scene: The window shatters and the gate in the ROOM WITH THE POOL AND FALLING WATER opens, so the VENUS STONE is accessible.
Climb onto the windowsill and pick up the small medipack and Uzi clips. Climb through the shattered window and get another small medipack at the left end of the ledge. Safety drop to the street.
The ROOM WITH THE POOL AND FALLING WATER is just across the street. But before going back there, return to the start of the level. To get there, begin with Lara's back to the ROOM WITH THE POOL AND FALLING WATER. Head to the right, around the building, past the palm tree and through the raised gate. Turn left and continue with the white wall on Lara's left, past the barred alcove. (The ABANDONED BUILDINGS you explored at the beginning of the level are on the right). The gate at the far end of the white wall is now open. Inside you'll find a golden rose (secret #3, 6/36).
Return to the ROOM WITH THE POOL AND FALLING WATER. Swim down and forward, then to the left. Pick up the VENUS STONE and swim straight on to the next room. Pull up into the doorway.
Cut Scene: You're back in the GARDEN WITH THREE GARGOYLE HEADS from the first level, and Larson is waiting. A transcript of the dialogue, both before and after Lara guns down Larson, appears here.
GARDEN WITH GARGOYLE HEADS: After the cut scene, Larson moves to the front of the building and starts shooting. Return fire until he falls. When he struggles to his feet another cut scene ensues.
(NOTE: You may want to save the game as soon as the second cut scene ends. That way you won't have to fight Larson again if Lara is killed by the gargoyles. And, if she catches fire, you can reload and not have to replay much.)
After the cut scene, immediately re-draw weapons and blast away at the 3 gargoyle heads. Be sure to keep moving. If the gargoyles' fire breath hits Lara, she'll ignite. You can jump into the pool where you entered to put out the fire, but Lara will lose a lot of health. So you're better off avoiding this altogether. Positioning Lara just forward of the palm trees and jumping from side to side while shooting worked pretty well for me playing on the PC (i.e., hold the Action and Jump keys and press left, left, right, right, etc.). Use medipacks as you go (9 and 0 are the PC hotkeys) and run behind the building if you need to catch your breath. (There's also a large medipack back there if you need it.)
Alternatively, run forward and duck behind either side of the gargoyle building. Lara is safe here from the fire breath. Position Lara facing the wall of the building and sidestep toward the front until she's a few steps away from the corner. Now side flip out from behind the building while firing. After a few shots, side flip back behind the building. Keep this up and eventually you'll hear mechanical clanking as one of the gargoyles explodes. Repeat until all three are destroyed. You may want to save periodically in case Lara gets toasted.
When you've destroyed all three gargoyles, pick up the various goodies around the area. (Don't forget to look behind the building.) In addition to the medipack, you'll find 2 boxes of regular and 2 boxes of wide-shot shells.
Place the VENUS and MARS STONES in their receptacles to open the door. Enter and take a running jump over the spike pit to grab the ledge in the middle of the cave. Pull up and take another running jump to the ledge near the golden sun. The ledge collapses and Lara slides into the next level.
*Note on Kills: Larson is designated as an enemy, but since Lara doesn't kill him, he is not part of this total.
**Note on Secrets: There are 36 golden roses in the game. If you find them all, after the credits you'll be able to access "Special Features" from the options menu. This is a collection of storyboards, etc., created during the game design.
WAS THIS WALKTHROUGH HELPFUL? If not, I apologize and invite you to contact me with any questions. If you need help right away, I recommend the r/TombRaider subreddit. Other fan-run forums are listed at tombraiders.net/stella/community.html. If this site was useful, please consider supporting it financially or in other ways. For details, visit tombraiders.net/stella/support.html. As always, I welcome your corrections/suggestions. Thank you!
Copyright © 2000- - Stellalune (). Special thanks are given to the participants in the alt.games.tombraider newsgroup, without whom some parts of this walkthrough couldn't have been written, and to the many, many people who emailed me with suggestions and corrections. I'm sorry I can't thank you all individually this time. Special thanks to Helena for the tip on destroying the mechanical head. Feel free to copy or print this walkthrough for personal use. By all means, share it with friends, but please include this credit line so people can send me their feedback. No part of this walkthrough may be reproduced on another site without permission. As an Amazon Associate I earn from qualifying purchases. Follow this link for details about this site's advertising and privacy policy.
Stella's Tomb Raider Site: tombraiders.net.