INTRODUCTION: To save space here, I've included transcripts of the introductory FMV (full-motion video) sequences on a separate page.
BUG NOTE: Using Windows' CD auto-run feature may result in a bug where you are unable to save your game or load your saved games. If this happens, instead of running the game from the setup screen that appears when you insert the CD-ROM, close that window (or disable auto-run completely) and try running the game from the Start Menu. Or, create a desktop shortcut to the TR5 icon in the 'Tomb Raider Chronicles' folder and use that to start the game. Unless a patch is released to fix this problem, this work-around should help.
LEVEL 1: STREETS OF ROME |
Updated: 9/18/01 |
Kills: 5 (6)* Items: 23, plus the Revolver, Laser Sight (twice), 3 keys, Saturn Stone, and 3 Golden Rose Secrets**
Starting Inventory: Pistols (unlimited ammunition), binoculars, 3 flares, 3 small medipacks, 1 large medipack, Mercury Stone.
(NOTE: Lara gets new equipment at the beginning of each episode, so there's no need to conserve ammunition for any huge final boss. Feel free to use the more powerful weapons when you find them.)
BACKSTAGE STOREROOMS/TRAINING AREA: Enter the doorway on the left marked "Opera Backstage." This is a training area of sorts, in that Lara explains some of her basic moves as you go. Nothing here advances the plot; however, there are items to be found, including a secret. So even seasoned raiders should explore this building. If you need any help with the moves or controls, see my Controls and Strategy pages.
Follow Lara's instructions and vault onto the wooden crate. From there, climb to the cement ledge above. Go to the end of the ledge. Here Lara explains how to do a standing jump from the metal-grated tile to the metal tile on the next ledge. Go through the doorway ahead to a room with a wooden floor. Follow Lara's direction and take a running jump across the gap in the floor. Before going on, go around the back of the metal cage. Face it, jump straight up and grab the edge. Pull up and pick up the small medipack on top. Take a standing jump over to the metal scaffolding and pick up flares and a large medipack. (You'll need to crawl into the alcove to get the medipack.) Jump back to the metal cage, drop to the wooden floor and continue through the doorway to the next area.
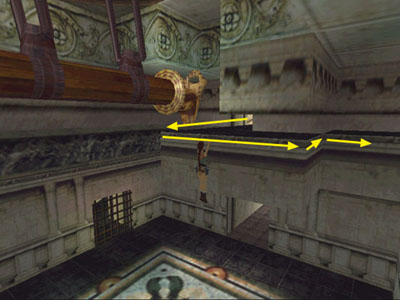
This room contains widely spaced ledges and a crate dangling from a winch. Here Lara tells you how to do a running jump and grab to get from one ledge to the next. Do the jump then follow the elevated walkway around to the end. Side flip to the left (or just jump) onto the next ledge. Continue forward through the doorway back to the dangling-crate room. Jump straight up to grab the overhead bars and monkey swing across the room. Climb the ladder on the wall almost to the top, then climb around the corner to the right and let go. Crawl through the low opening. At the end, turn right and back up to the edge. Press Action and reverse to make Lara lower herself to the floor. Or, a new TR5 move: crawl forward to the edge of the opening then press Jump to somersault out of the opening.
Use Action to pull the switch in the alcove and open the door. Go down the stairs to a room with a forklift in a storage cage. Go to the far end of the room, climb the crates and jump to the cement ledge. Here you'll find a pool to practice swimming.
Swim through the underwater tunnel to another pool where you can surface. There are two exits: a door at water level and a square opening on the bottom. Swim down through the square opening and follow the tunnel to a small room where you can climb out of the water (Action + forward). Here you'll find some goodies—revolver bullets, shotgun shells and a large medipack. Follow the tunnel back to the previous pool. Climb out of the water into the doorway. Continue to emerge on a ledge above the room with the first pool.
Go through the doorway on the left and practice tightrope walking across the room. Be sure to let Lara fall at least once (or climb down the crates) to explore the room below. Beyond the crates is a room containing metal shelves. Search the shelves (Action) on the left to find some flares. Push (Action + forward) the black shelves in the back right corner to uncover revolver bullets. Push the black shelves in the right corner as far as they'll go to reveal a secret passage. Follow this to a small room with more shelves. Pick up Uzi clips on the floor and a golden rose (secret #1, 1/36) on one of the shelves. Return to the tightrope room and climb the crates to the upper level.
You'll pass a few more shelves on the way out. The one on the right has a small medipack. Keep going to a dead end and pull the switch to open the door and emerge back where you started (in the first room with the forklift). Drop down and exit to the right.
BACK ON THE STREET: Go to the left along the street where you began the level. Ahead is what appears to be a dead end. Above on the right is an ARCHED BALCONY, orange with white columns. You can't reach it yet. Notice the dark square on the ground and the barred alcove with the hanging greenery. You'll return soon.
Leave this area and turn left (right if you're coming from the start of the level) through the narrow alley with the lamps up above. Continue to an OPEN COURTYARD WITH A FOUNTAIN. A Doberman attacks. (I have to wonder at this point—especially having played TR2 as well—whether someone on the design team had a bad dog bite experience while vacationing in Italy.)
Make a mental note of the locked gate and keyhole on the left side of the courtyard. Follow the narrow alley on the right (near the red-and-white striped awning), which leads past a barred opening to a panel with a carved face. Reach into the niche carved into the face (Action) to operate a mechanism that opens a gate elsewhere.
Return to the FOUNTAIN, turn left into the alley with the lamps, and follow it back to the street. Turn right into the area with the up above. Beyond the hanging greenery is the gate you just opened. Go through and use another niche mechanism. When you do, a flock of bats flies out and tries to mess up Lara's hairdo. You can't kill them, so either flee or run Lara into a corner and crouch. She'll take little or no damage that way. When you leave this alcove, you'll see that you've raised a block that will enable you to climb to the ARCHED BALCONY.
Climb up but before going on, turn around (to face out over the raised block) and take a diagonal standing jump from the left archway to the cement ledge with the small medipack. Jump back through the archway and continue up the ramp to a SMALL ROOM WITH RED FURNITURE. Go through onto a balcony above the FOUNTAIN. Continue straight across and drop into a hallway with peach walls and white molding. Shoot the window and pick up the revolver bullets on the sill. You're now above another COURTYARD WITH A CLOTHESLINE. If you want to, turn around and dangle Lara from the sill (press and hold Action, then press reverse to drop and grab the edge) to attract the attention of another Doberman in the courtyard below. Then pull up onto the sill and shoot it from above.
Follow the peach-colored hallway around to some stairs leading down. On the way, shoot out two more windows. There's a small medipack on one windowsill. The other opens the way to the building next door, but wait to go there. First, go down the stairs (kill that dog now if you didn't before) and push open the blue double doors (Action). Another dog rushes out. Kill it then go in and retrieve a large medipack on the floor and wide-shot shells on the crate.
Go through the doorway on the other side of the courtyard (where the first dog came from). Follow the hallway to a switch, which you can use to open a gate leading back to the courtyard with the FOUNTAIN. (NOTE: You don't have to do this, but it could save you some backtracking if you fall later on while jumping from ledge to ledge.)
Return back along the hallway to the COURTYARD WITH THE CLOTHESLINE. Go to the right and up the stairs to the windows you shot out. Jump across the alley to the neighboring house. Enter and take the first left. At the top of the ramp you'll find a GOLDEN KEY. Backtrack to the end of this hallway and continue up to the left.
Cut Scene: A panoramic view of the fountain courtyard, which now contains a barking Doberman. The camera comes to rest on the locked door.
Jump over the railing onto the red-and-white awning. Pick up some flares. Then shoot the dog before dropping to the ground. Use the GOLDEN KEY to open the gate on the other side of the fountain.
COURTYARD WITH PALM TREES AND TIGHTROPE: Enter cautiously, Larson waits in the next room, up on a balcony to the left. Let him have it with your pistols and he'll run off shortly. Pick up a small medipack in the alcove on the right. Then go through the doorway below where Larson was standing. First go left down the ramp to a room with boxes. Here you'll find a GARDEN KEY (shaped like a star) on one crate.
Return to the hallway and continue left to the top. Larson will shoot at Lara again from the other side of the gap. Again, plug him a few times to scare him off. Then tightrope walk across to the opposite balcony. Drop down and, if you like, use the switch to open a gate leading back to the FOUNTAIN COURTYARD. (NOTE: As before, you don't have to do this, but it could save you some backtracking.)
Head away from the gate toward a WIDER STREET WITH A GATED GARDEN off to the right. This is where you'll use the GARDEN KEY, but you need another one first. Go to the left end of the street and through the small, square doorway. Follow the hallway, picking up some revolver bullets in a small room on the left. Make a mental note of the LOCKED WOODEN GATE with the small room behind it. This is the location of the second secret. You'll come back for it later.
Continue upstairs. Be sure to pick up the REVOLVER on the landing. (You probably won't miss it because the camera focuses on it so you're unable to look at anything else.) At the top of the ramp, push open the blue double doors. Inside this SMALL ROOM WITH WINE BARRELS you'll find the LASER SIGHT on the floor to the left and a padlocked gate on the right. Shoot the padlock: either use the revolver equipped with the laser sight to target it (check your instruction booklet or see the section on 'using the laser sight' on the TR5 controls page), or face the lock squarely and shoot continuously with pistols while crouching. Lara should hit the lock on the way down. Behind the gate is the second GARDEN KEY. A colony of rats swarms out. Some of these will try to bite Lara, so if you've gotten everything, run away downstairs. Or, run out, jump the railing and wait for the bats to disperse before returning to collect the key.
Go to the far end of the WIDER STREET and through the doorway on the left. Use the 2 GARDEN KEYS here to unlock the gate. Return around the corner to the WIDE STREET and enter the garden.
Cut Scenes: When Lara places the second key, you see a view of the garden interior, including a small building with three gargoyles. When she enters the garden and approaches the gargoyle building, there's a longer movie, in which Pierre and Larson spy on Lara from the rooftops. A transcript appears here.
Go through the doorway in the back right corner, behind the façade with the gargoyles. Follow the hallway to the top. You may or may not encounter another Doberman in the hallway.*
Cut Scene: A panoramic view of a temple with a bell hanging at the top.
TEMPLE WITH BELL: In case you missed the subtle hint in the cut scene, the camera shifts to the bell and won't budge until you move Lara out of range. There are three doors here: one on to the left, one top center and one bottom center of the temple. If you didn't find it earlier (in the SMALL ROOM WITH THE WINE BARRELS), you can pick up the LASER SIGHT at the top of the steps under the bell. There's also a box of revolver bullets behind the columns to the right of the upper door.
Combine the revolver and laser sight and target the bell. (Check your instruction booklet or see the section on 'using the laser sight' on the Controls page if you're having trouble with this.) When you hit it squarely, the door on the left side of the temple opens.
Backtrack for secret #2: Go down the ramp the way you came, exit the garden and turn right. Go to the end of the street and through the doorway to the area where you found the revolver earlier. In the little side room (you picked up some bullets here) the LOCKED WOODEN GATE is now open. Another Doberman charges out. Kill it. Then enter and take a large medipack and a golden rose (secret #2, 2/36) from the shelves. Return through the garden to the TEMPLE WITH BELL.
Climb the stairs and go through the door on the left, which opened when you shot the bell. Take a running jump across the gap to the next building, pressing Action to shorten the jump so Lara doesn't bang her head and fall. (Or use a standing jump from the edge, and press Action to grab the opposite edge. Then pull up.) Endure the swarm of bats as you use the mechanism in the niche to open the upper door of the TEMPLE (or crouch in the corner until the bats disperse). Jump back across the gap toward the temple.
One more side trip before entering the temple: Climb onto the high stone wall to the left of the temple (on the right if Lara's back is toward the temple). Follow the wall around the perimeter of the garden to the far end. Take a running jump to the orange-tiled roof ahead. Cross the tiled roof and take another running jump into the alcove ahead. Here you'll find revolver bullets and a large medipack. See this series of screenshots if you need visuals.
Enter the temple through the upper middle door, which you opened earlier. Here you'll find two ravens on pedestals. Go through the doorway in the back left corner. Use the switch to shatter the raven statue, revealing a dove. Stand near the dove pedestal and press Action to rotate it. This opens a door elsewhere and sets the battering ram above swinging. Go through the other corner doorway and follow the passage to a ledge near the battering ram. Turn so the battering ram is on Lara's right and drop back to grab the edge of the ledge. Traverse around to the right until you can pull up onto another ledge (as shown in this screenshot). Use the switch in the alcove to turn the second raven into a dove. Safety drop to the floor. Turn the second dove pedestal to open the door outside at the base of the temple.
Exit the temple, but before going through that third door, retrieve another secret. Turn right and go through the door you opened earlier by shooting the bell. Jump across the alley to the room with the carved face niche. Turning the second dove also opened two small alcoves in this room. Pick up a small medipack and a golden rose (secret #3, 3/36). Jump back across the gap to the TEMPLE.
Go through the door at the base of the temple and get the SATURN STONE. Walk back outside to end the level.
Cut Scene: Lara emerges from the temple only to be ambushed by Pierre and Larson. A transcript of their exchange appears here.
NOTE: For more information about the 'Mouth of Truth' statues in this level, and other real-world items and locations featured in the games, check out the Artefactual series from Tomb Raider Horizons.
*Note on Kills: There is one doberman that apparently may or may not appear in the hallway leading up to the temple with the bell. My esteemed colleagues at the Tomb Raiders Traveler's Guide swear they've seen it, so I believe it.
**Note on Secrets: There are 36 golden roses in the game. If you find them all, after the credits you'll be able to access "Special Features" from the options menu. This is a collection of storyboards, etc., created during the game design.
WAS THIS WALKTHROUGH HELPFUL? If not, I apologize and invite you to contact me with any questions. If you need help right away, I recommend the r/TombRaider subreddit. Other fan-run forums are listed at tombraiders.net/stella/community.html. If this site was useful, please consider supporting it financially or in other ways. For details, visit tombraiders.net/stella/support.html. As always, I welcome your corrections/suggestions. Thank you!
Copyright © 2000- - Stellalune (). Special thanks are given to the participants in the alt.games.tombraider newsgroup, without whom some parts of this walkthrough couldn't have been written, and to the many, many people who emailed me with suggestions and corrections. Special thanks to Jon O. for the tip about crouching in a corner to avoid bats. I'm sorry I can't thank the rest of you individually, but so many people submitted the same suggestions. Feel free to copy or print this walkthrough for personal use. By all means, share it with friends, but please include this credit line so people can send me their feedback. No part of this walkthrough may be reproduced on another site without permission. As an Amazon Associate I earn from qualifying purchases. Follow this link for details about this site's advertising and privacy policy.
Stella's Tomb Raider Site: tombraiders.net.