Stella's Tomb Raider Chronicles Walkthrough - Windows, Mac, PlayStation, PSP, Vita & Dreamcast
LEVEL 4: THE BASE | Updated: 9/18/01 |
Kills: 10 Items: 8 plus Uzis, Desert Eagle Pistol, Laser Sight, 2 keys, 1 keycard, a fuse and 3 Golden Rose Secrets**
Starting Inventory: Pistols (unlimited ammunition), binoculars, 3 flares, 3 small medipacks, 1 large medipack.
(NOTE: Lara gets new equipment at the beginning of each episode, so there's no need to conserve ammunition for any huge final boss. Feel free to use the more powerful weapons when you find them.)
Slide down the chute to land in a dimly lit hallway. Go to the right down a series of ramps to an open door. Enter a HUGE ROOM WITH STORAGE CRATES AND MECHANICAL CLAW.
Cut Scene: The camera pans the room showing the claw moving overhead and the claw operator in a control room overlooking the room.
While exploring this room, you can keep Lara safe from the mechanical claw by running across the open areas and taking cover in the doorways and under the overhanging ceilings at the outer edges of the room. Also, the claw casts a circular shadow on the floor before it descends. If you keep an eye on this shadow, you can usually jump out of the way in time.

Turn around (to face away from the locker) and run to the far right corner of the room. Behind the tall stack of crates is a locked door. Use the key you just found to open it.
Enter and go up the stairs to a control room. Shoot the 2 soldiers inside through the window. (The window ledge makes good cover.) One soldier drops a SWIPE CARD when he dies. Pick this up and search the lockers to find the UZIS. Return downstairs to the CRATE-AND-CLAW ROOM.
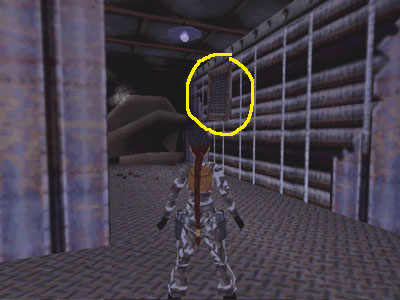
Run around the crates and across the room to the door under the balcony to the left of the control room. (This is one of the doors marked 'S' in the diagram.) Use your borrowed card in the receptacle to the left of the door to open it. Enter and shoot the German shepherd. Collapsed ductwork blocks the hallway. Draw pistols and jump up to shoot the grate that's hanging crookedly. (It's outlined in this screenshot.) Climb into the duct and pick up a golden rose (secret #1, 10/36).
Return out to the CRATE-AND-CLAW ROOM. Turn left and follow the wall to the other swipe-card door. Use the card to open it and go up the stairs to one of the balconies overlooking the big room.
Now you're going to jump across the boxes to the balcony on the other side of the control room, while avoiding the mechanical claw. Save your game. The red arrows in the diagram show the path you'll take, and these screenshots give more detail if you need it.
Take a running jump from the balcony to the stacked boxes below the control room on the right. (NOTE: Set it up so Lara takes off close to the end of the broken railing. If you're new to Tomb Raider, see my strategy page for info on setting up jumps.)
From there, take a running jump to the big stack of boxes in the middle of the room. Jump onto the single wooden crate on top of the stack. (NOTE: If Lara is about one box width away from the crate, a forward standing jump will land her on top more quickly than climbing would.)
Now take a running jump to the stack of boxes under the other balcony. Do not press Action during this jump or Lara won't make it. (Or, instead of jumping from the higher wooden crate in the middle stack, start from the wooden crate below it—the one that juts out from the stack toward the CONTROL ROOM. From there, take a running jump to grab the edge of the stack of boxes under the other balcony. Pull up.) Jump onto the wooden crate on top of the stack below the balcony. From there, take a running jump to grab the edge of the balcony. Pull up.
Follow the balcony around to the door of the CONTROL ROOM. Use the button to open the door. Enter.
Cut Scene: Lara overpowers the claw operator and uses the claw to rip out a section of wall in the room below.
Search the cabinets in the control room to find Uzi clips and a small medipack. Use the button in the doorway to open the other exit from the control room. This leads back to the balcony where you started your jumping.
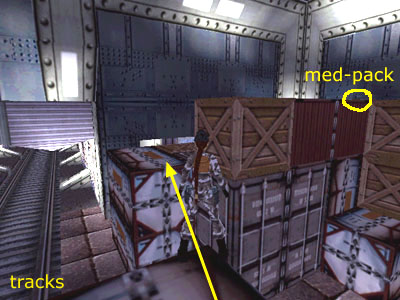
Now, if you want to, you can go after a couple of goodies on top of the crates. (Otherwise, just go downstairs and follow the TRACKS.) Jump from the balcony to the boxes below the control room window, as you did before. From there, jump to the middle stack of boxes. Cross to the other side of the stack and take a running jump to the stacked boxes to the right of the section of wall Lara ripped out (as shown in this screenshot). On top you'll find a small medipack (also marked on the diagram).
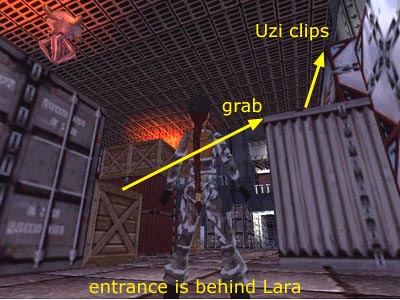
Drop to the floor and return to the corner of the room where you first entered. Climb on the single wooden crate in the stack to the right of the door (left if Lara's back is to the entrance). Take a running jump to grab the edge of the big, metal box on the other side of the entrance. Climb to the top to get some Uzi clips. (This sequence is shown in this screenshot, and the clips are marked on the diagram.)
THE TRACKS: Exit the claw room along the tracks revealed when Lara ripped out the wall. Two soldiers emerge at the far end. Take them out and continue to end where a roll-down door blocks the way. Go through the doorway on the left and follow the hallway outdoors.
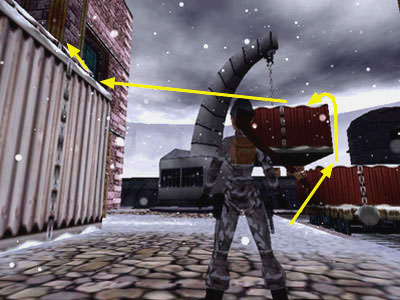
SUBMARINE DOCK - LEFT SIDE: A tall stack of crates separates this side of the dock from the RIGHT SIDE. Climb onto the box on the train car and from there onto the crate hanging from the crane. Take a running jump to the stack of boxes against the building. Do not press Action during this jump or Lara won't make it. (See this screenshot to get oriented.) Climb to the top of the stack to get a golden rose (secret #2, 11/36). Climb down. Then use the SWIPE CARD to open the door behind the crane.
MACHINE ROOM: There's a soldier lurking inside. Kill him and take the SILVER KEY he drops. Take note of the machine with the yellow fuses on the back. You'll see it's missing a fuse. Go back outside and re-enter the main building. Follow the hallway, cross the TRACKS and go through the door on the opposite side. Go up the stairs to a locked door. Use the SILVER KEY to unlock it. Step outside.
Cut Scene: Lara overhears two men talking on the dock below. Their dialogue appears on the movie transcript page.
SUBMARINE DOCK - RIGHT SIDE: Go to the right end of the ledge. Take a running jump to grab the corner ledge; pull up. Go to the left end of the corner ledge and take a running jump to grab the edge of the ledge nearest the submarine. Pull up and take the LASER SIGHT and some Desert Eagle clips. Safety drop to the ground. Use the swipe card to open the door below the ledge where you entered this area.
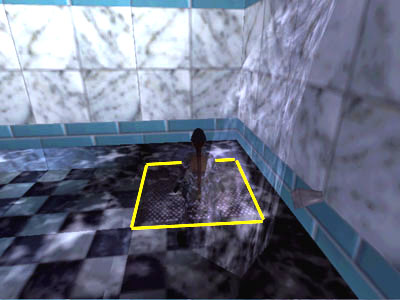
LOCKER ROOM: Enter and shoot the German shepherd. Search the lockers to find the DESERT EAGLE PISTOL, Desert Eagle clips, a small medipack, a FUSE and Uzi clips. Find the grate on the floor in the far right corner of the flooded showers. Stand Lara at the edge of the grate (as shown in this screenshot) and press Action to open it.
Swim down through the flooded passage. Turn right at the T intersection. Follow the long tunnel through various twists and turns. Eventually you'll surface in a small room where you'll find another golden rose (secret #3, 12/36). From here you can see the submarine through the bars. Swim back through the tunnel to the LOCKER ROOM.
Go through the short hallway on the left and press the button to open the door. Go through to emerge back at the hallway near the TRACKS.
Cross the TRACKS and go out the other door to the RIGHT SIDE of the SUBMARINE DOCK. Before going outside take a moment to prepare; now there are snipers in two of the high windows (their locations are shown in these screenshots). Combine the DESERT EAGLE and LASER SIGHT. Run out to the train car with the box on it. If you position Lara behind it (on the right side, away from the crane), she can target the sniper in the window above the tracks without being hit by the other sniper. One well-aimed head shot will kill the sniper. After you've taken out the first sniper, you can target the second from on top of the train car using the dangling crate for cover.
Return to the MACHINE ROOM behind the crane. Place the FUSE in the machine on the left side where the fuse is missing. (Use the Action key for this, just like unlocking a door.) A door opens nearby and the fans turn on.
Go back around the machine. Kill the dog that comes in from outside. Then go into the alcove on the left, behind the door that just opened, and press the button.
Cut Scene: The crane rotates, moving the dangling box.
Go back outside. Climb onto the box on the train car. From there take a running jump to grab the crate hanging from the crane. Pull up. Then take a running jump to hull of the submarine.
Cut Scene:Lara lands on top of the sub and hides behind a crate. A stevedore emerges from the hold, and Lara makes a noise to attract his attention. When he comes to investigate, she subdues him and sneaks on board. After taking stock of her surroundings she mutters, "Hmph. Economy class."
*Note on Secrets: There are 36 golden roses in the game. If you find them all, after the credits you'll be able to access "Special Features" from the options menu. This is a collection of storyboards, etc., created during the game design.
WAS THIS WALKTHROUGH HELPFUL? If not, I apologize and invite you to contact me with any questions. If you need help right away, I recommend the r/TombRaider subreddit. Other fan-run forums are listed at tombraiders.net/stella/community.html. If this site was useful, please consider supporting it financially or in other ways. For details, visit tombraiders.net/stella/support.html. As always, I welcome your corrections/suggestions. Thank you!
Copyright © 2000- - Stellalune (). Special thanks are given to the participants in the alt.games.tombraider newsgroup, without whom some parts of this walkthrough couldn't have been written, and to the many, many people who emailed me with suggestions and corrections. I'm sorry I can't thank you all individually this time. Diagrams made with the aid of GraphTablet freeware (http://www.graphtablet.com). Feel free to copy or print this walkthrough for personal use. By all means, share it with friends, but please include this credit line so people can send me their feedback. No part of this walkthrough may be reproduced on another site without permission. As an Amazon Associate I earn from qualifying purchases. Follow this link for details about this site's advertising and privacy policy.
Stella's Tomb Raider Site: tombraiders.net.