EXPERT CHALLENGE: River Ganges - 100% Completion
IMPORTANT: This guide assumes some familiarity with the level and with the TR3 controls. If this is your first attempt at the River Ganges, I strongly recommend following the main walkthrough. If you simply must experience both possible routes, play through to the point where the path splits, save the game, then save in a new slot. Follow the PATH THROUGH THE RUINS. Then reload the earlier save and follow the PATH ALONG THE RIVER to the end of the level, in order to obtain all 5 secrets.
OK, you've been warned. Now the good stuff, with a few more warnings at crucial points. (Sorry. I just can't help myself. I live to warn.)
LEVEL START TO GOLD DOOR: The beginning of the level is the same regardless of which path you choose. Rather than copy/paste, I'll recap and you can refer to the main walkthrough as needed.
- Obtain secret #1, then return to the quad bike.
- Jump the quad bike across the river, enter the caves on the bike, and obtain secret #2.
- Continue through the caves, on the bike then on foot, to open the gold door.
At this point, you should have 2 secrets, 2 crystals, 8 pickups, and 4 kills. You must now make a CHOICE OF PATHS.
First take a short detour on foot down the RIGHT PATH toward the ruins (screenshot). Go just as far as the riverbank and shoot the monkey (5) that appears on the opposite bank. (screenshot) Try to kill it before it disappears down the hole, but if it escapes, don't worry. You will be able to finish it later as you explore the ruins, but you must trigger it from this side or it will not appear at all. Now return up the tunnel to the gold door and the quad bike.
LEFT PATH - ALONG THE RIVER: From this point, you'll once again follow the main walkthrough for a while.
- Navigate through the caves on the quad bike.
- Exit the caves on the bike and obtain secret #3.
- Continue across the stone bridge (still on the bike) and jump the gap to the other side of the river.
- Take a little detour on foot to get some ammo and kill 2 vultures. Then return to the bike.
- Follow the NARROW LEDGES AND TREETOPS (on the bike) and jump across the river once more.
- Collect a crystal, kill a cobra, and pick up some ammo.
- Return to the bike and jump across the river once more to arrive at the top of the ROCKY SLOPE.
Again, all of this is covered in the main guide. At this point, you should have a total of 3 secrets, 4 crystals, 13 pickups, and 8 kills (the ones in the main walkthrough plus bonus monkey #5).
ROCKY SLOPE, 4th SECRET, AND GREEN CAVE: When you come to this area, where the two paths converge, things might get a little confusing. Again, refer to the main walkthrough for specifics.
- Slide down the left side of the ROCKY SLOPE, kill a couple of vultures, climb onto the ledge protruding from the left canyon wall, and follow the high ledges to secret #4.
- Return along the ledges to the ROCKY SLOPE and climb/slide all the way down to the base of the slope.
- Continue to the right into the GREEN CAVE with the save crystal and 2 monkeys.
At this point, you should have a total of 4 secrets, 5 crystals, 15 pickups, and 12 kills (the ones in the main walkthrough plus bonus monkey #5).
GREEN CAVE: The opening on the left side of the GREEN CAVE leads to the WATERFALL, SECRET #5, and the LEVEL EXIT. The opening on the right leads to the RUINS. (screenshot) That is where you would have come from if you had chosen the RIGHT PATH at the fork, and that's where we're headed now. After exploring the RUINS, you will then have to make a tricky jump to get back across the river to this point.
IMPORTANT: Be sure to save the game and then save again in a new slot before jumping across the river, in case you are unable to get back. Do not overwrite the original save until you finish exploring the ruins and return to this point. Then if you get stuck on the other side of the river, you can reload the earlier save and continue from the GREEN CAVE. You won't have everything, but at least you'll be able to get all the secrets and move on. If you forget to do this, you'll have to restart the level or download a different save file (Follow these links for classic and remastered saves.)
JUMPING ACROSS THE RIVER TO THE RUINS: This sequence is shown in a series of screenshots and a short video. Position Lara at the left side of the cave opening overlooking the river. The opening to the WATERFALL is behind and to her right. Take a carefully angled running jump, curving slightly to the left to clear the edge of the cave opening, to land on the tree root jutting out into the water on the opposite side of the river. This jump is indicated by by the curved pink arrow (letters A and B) in the diagram below.
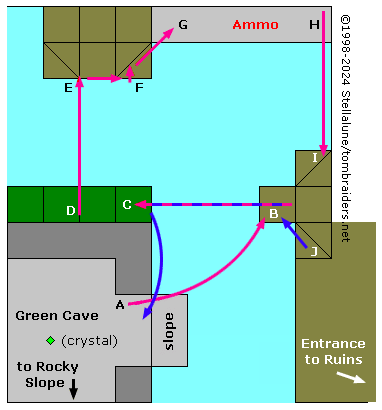
RIVER BEND WITH LEDGES: Now, go after a tricky ammo pickup, described below and illustrated with more screenshots and video. After jumping across the river from the GREEN CAVE, Lara will be standing on the tree root jutting out over the river (B in the diagram). Turn to face the ledge (C) just to the right of the GREEN CAVE opening. Take a running jump to land on that ledge (indicated by the blue-and-pink arrow in the diagram). Move along this ledge to the slightly higher point (D). It is important to start from the highest point on this ledge in order to make the next jump. Turn right, walk to the edge, and carefully position Lara so she's facing the middle of the big tree on the opposite bank. Hop back and then take a running jump across the water to grab the sloping base of the tree on the other bank (D to E). Traverse to the right and pull up (E to F). Hop over to the ledge where the ammo is sitting (G). Pick up Uzi clips and harpoons (items 16-17).
Now for the return trip. You may want to save before attempting the following. Just be sure you don't overwrite your previous save in case you can't get back and need to reload the earlier save. Move to the end of the ledge near the corner (H) and turn right to face across the water toward the tree where you started (I). Position Lara on the left (higher) side of the block nearest the wall, facing the left side of the block that forms the nearest tree root. Hop back, take a running jump across the water, and grab the edge of the root (H to I in the diagram). Traverse to the right and pull up. Then take a series of standing jumps around the tree to get back where you started. (If Lara won't grab the tree root using this precise positioning, there are a few alternatives shown on the page with screenshots and in the video.)
Before entering the ruins, you should have a total of 4 secrets, 5 crystals, 17 pickups, and 12 kills.
INTO THE RUINS: This guide more or less follows the RUINS PATH from the main walkthrough in reverse. It references area names in that part of the guide. We'll do a few things differently, and of course some backtracking will be necessary. We'll collect the GATE KEYS for the sake of completion, but since we don't have the quad bike, we won't actually need to open the gates in order to drive through.
Enter the ruins through the opening ahead. (screenshot) As you follow the wide passageway into the ruins, roll and shoot 2 monkeys (13-14) that try and sneak up from behind. Turn around again and proceed into the COURTYARD WITH THE LARGE TREE AND TWO-STORY BUILDING. Head for the far left corner. Climb onto the rocks and jump to grab the jutting tree limb. Pull up. Then jump into the wide, manmade opening on the left to trigger the appearance of another monkey (15) on the upper level of the two-story building. Turn around, jump back to the tree branch, kill the monkey, then jump across the branches to the doorway on the upper floor of the TWO-STORY BUILDING. (screenshots)
Enter the building and head to the left, past the hole in the floor with flames below, and around the corner to the left. Shoot 2 monkeys (16-17). When you approach the items on the far side of the room, 2 more monkeys (18-19) come in from behind. Kill them as well and pick up a rocket, Uzi clips, and a GATE KEY (18-20). (screenshot)
Return to the hole in the floor and drop down into the room below, taking care to avoid the fire-breathing statue. Shoot another monkey (20). Go around to the far end of the room, kill yet another monkey (21), and push the button on the left wall of the raised alcove to open the gold door next to the button. (screenshot) Doing so also lets in 4 more monkeys (22-25). One enters immediately. The others converge as you step into the doorway.
NOTE: Pressing this button also opens one of the large gates outside, but since we won't be driving the quad bike through the ruins, that doesn't matter.
Exit through the gold door and make a U-turn to the right, into the muddy alley between the two buildings. The open gate and quicksand pool are ahead on the left. On the right is a high ledge with some shotgun shells (21). Jump up to grab the ledge at either end where it's a little lower. Get the ammo and drop back down. (screenshots) Ignore the quicksand area and head back toward the big tree. Climb onto the low block in the corner, and from there, into the opening in the manmade stone wall above on the right. (screenshot)
Drop down into the OUTDOOR AREA WITH QUICKSAND POOL AND TWO GATES. There are 2 more monkeys (26-27) here. One comes down from the ledge with the save/power-up crystal (above the closed gate) as you approach. The other is triggered when you stand near the hole in the ground in the left corner, near the tree where you came down into this area. Shoot both monkeys, get the crystal, and drop down through the hole. (screenshot)
L-SHAPED ROOM WITH LIT TORCHES AND TWO KEYHOLES: Just inside this room are raised alcoves to the left and right, each with a keyhole. This is where you'd normally use the GATE KEYS. Again, we won't bother with that since we aren't driving. Continue forward and around the corner to the right. Step into the small alcove with the shotgun shells (22), roll, and kill another monkey (28) that follows you around the corner. Approach the steps leading up to the raised window with the small medi pack (23). Roll and shoot another monkey (29) that comes around the corner after the first. (screenshot) If you hesitate, the monkeys will try to grab the medi pack, so you may find it in a different location.
Follow the passageway to the left of the steps, but don't pull up into the raised opening yet. Instead, roll and shoot another monkey (30) that spawns on the steps and climbs down toward you. When it's dead, turn around, crawl through the raised opening, and drop down on the other side.
TUNNEL INTO THE RUINS: Since we're going backwards, this is actually the tunnel out of the ruins, but for consistency's sake, we'll use the same place names as the main walkthrough. You emerge on a slope. Below and to the left is a dark cave. Above and to the right is greenery. For now, we'll go right. Walk up the slope as far as you can. Then take a standing jump up the steeper section. This triggers the appearance of 2 monkeys (31-32): one from straight ahead, one from the ledge above on the left. (screenshot)
Now continue beyond the top of the slope. (A wide corridor leads off to the right. This is where you would drive the quad bike if you took the normal route through the RUINS. You can ignore it.) In the far left corner is a raised opening leading into a small cave. Inside you'll find flares and Uzi ammo (24-25). (screenshot) Exit the cave, turn right, and return to the top of the slope.
Before sliding down, climb onto the ledge on the right, where the last monkey came from. Walk forward along the ledge into another small cave. (screenshot) Watch out for the cobra (33) lurking inside. Kill it, then crawl under the low overhang on the right to find another GATE KEY (26). Again, you won't need it, but we're after 100%, right? Crawl back out, exit the cave, and slide down the slope.
Follow the dark tunnel around the corner to the right and shoot another monkey (34). Climb the block ledges to find a small medi pack (27) at the top. (screenshots) If you're slow to kill the monkey, or if you triggered but didn't kill that other monkey (5) way back at the fork in the paths, one of them may try to steal the medi pack. Hunt them down and get it back.
This the riverbank opposite the cavern where the path split near the start of the level. You can't go any farther. At this point, you should have a total of 4 secrets, 6 crystals, 27 pickups, and 34 kills.
NOTE: If you came to this guide late and didn't trigger the legendary fifth monkey, as described above, you will be one kill short. As far as I know, there's no way to make it spawn from this side of the river.
RETURNING THROUGH THE RUINS: Drop down into the hole you just climbed out of. Follow the dark tunnel back around the corner to the left. At the bottom of the slope, look for the small, raised opening on the right. (screenshot) Climb in, crawl through, and drop down on the other side.
Continue through the L-SHAPED ROOM WITH LIT TORCHES AND TWO KEYHOLES. At the far end, ignore the 2 raised alcoves with the keyholes again and go through the opening on the right. (screenshot)
Climb up through the hole in the ceiling into the OUTDOOR AREA WITH QUICKSAND POOL AND TWO GATES. Turn to face the angled block to the left of the hole (i.e., left as you climb out of it, right if you're facing it). Then pivot just slightly to the right so Lara's back is toward the angled block behind her. Backflip onto that block, then immediately jump forward to grab the taller block on the other side of the hole. Pull up. (screenshot) Turn right, jump over to the broad tree branch, then jump from there to the manmade opening overlooking the COURTYARD WITH THE LARGE TREE AND TWO-STORY BUILDING. Hop down, cross the courtyard, and follow the wide passageway out of the ruins. (screenshots)
You're now BACK AT THE RIVER BEND. Across the water is the GREEN CAVE, and beyond it the level exit.
You won't have gotten any new kills or pickups, but before you go on, maybe just make sure you have 4 secrets, 6 crystals, 27 pickups, and 34 kills.
JUMPING BACK ACROSS THE RIVER: To get back across the river to the GREEN CAVE without the quad bike, follow the blue arrows in the diagram (above). Also refer to these screenshots and video. (The return trip starts at the video's 1:00 mark.) First jump over to the jutting tree root on the right (G to B in the diagram). Take a running jump across the river to the long, rectangular ledge to the right of the GREEN CAVE opening (indicated by the blue-and-pink arrow pointing from B to C in the diagram). Then take a running jump along the short edge of the ledge, around the corner, and into the GREEN CAVE. This is shown by the curved blue arrow (C to A) in the diagram. Be sure to follow the screenshots and video to help with the finicky setup if you're using classic tank controls.
NOTES: If you're struggling with the last jump and are playing the classic game using the widescreen patch, you may want to temporarily revert to standard aspect ratio (1024x768, etc.). This can make a big difference here. Thanks to MrMyrddraal, for suggesting this in a comment on my video. If you're playing the remastered game, modern controls might help, though I was able to all of the jumps, as described here, using tank controls.
If you can't make it back, either reload the save you made earlier before crossing the river, download one of my save files (classic or remaster), or use the level-skip cheat as a last resort. If you skip the rest of the level, you'll miss secret #5 and may disable some achievements/trophies in the remastered game. But as long as you have the first 4 secrets, you can make up the missing one later in the Coastal Village level, which includes an extra secret. As long as you have 59 secrets at the end of the game, you'll unlock the bonus level.
WATERFALL AND LEVEL EXIT: Once you're back on the other side of the river, head for the well-lit opening ahead on the right. (screenshot)
Continue into an open area were the water spills over a cliff into a small pool. Climb onto the tan rocks on the left. Walk down the slope to the end of this rocky ledge. If you want all the goodies, don't jump into the water just yet. There's some ammo on a small ledge on the far side of the pool and a secret inside the little cave below on the right. Take a running jump across the gap to the next stone ledge. Kill 3 more vultures (35-37). Here it may help to jump across and trigger the appearance of the vultures and then jump back to the ledge you came from, where you'll have more room to maneuver as you shoot. When the coast is clear, jump back across the gap to the rectangular ledge that runs along the left canyon wall. (screenshots)
Move to the end of this ledge and jump to the small square ledge ahead on the right. Safety drop to the ledge below and pick up harpoons and MP5 clips (28-29). Turn around and take a running jump across the pool to grab the horizontal crevice. Traverse to the right, pull up, and crawl into the cave. This is SECRET #5. Get the goodies—a save/power-up crystal, harpoons and shotgun shells (30-31)—then back out and drop into the pool. (screenshots)
Notice the broken raft in the pool below the falls. Apparently Tony came this way as well. Swim down and grab the small medi pack (32) sitting on the bottom near the raft. Then climb out of the pool and follow the rocky passage behind the waterfall to finish the level. (screenshots)
Your final stats should show 5 secrets, 7 crystals, 32 pickups, and 37 kills. To the best of my knowledge, that's 100%.
ACKNOWLEDGEMENTS: Massive thanks to Lin, Laura, and Zak, as well as Ivans and Brian from the Tomb Raiders Travelers Guide, who helped make this 100% guide possible.
[Return to the Main River Ganges Walkthrough]
Copyright © 1998- - Stellalune ( ). All rights reserved. Feel free to copy or print this walkthrough for personal use. By all means, share it with friends, but please include this credit line so people can send me their feedback. No part of this walkthrough may be reproduced on another site without permission. As an Amazon Associate I earn from qualifying purchases. Follow this link for details about this site's advertising and privacy policy.